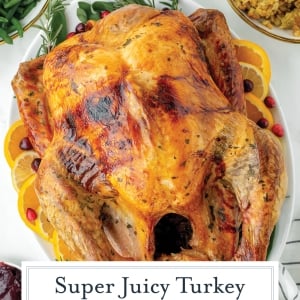
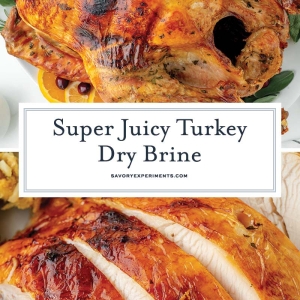
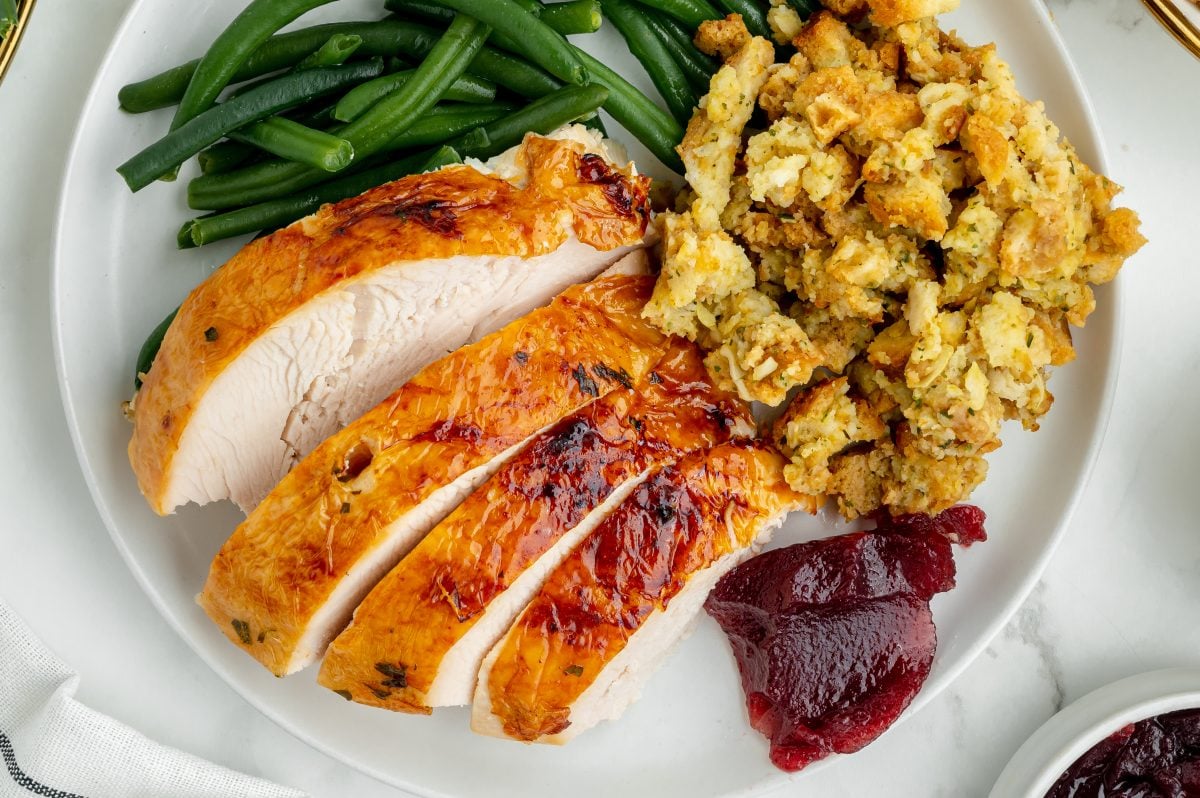
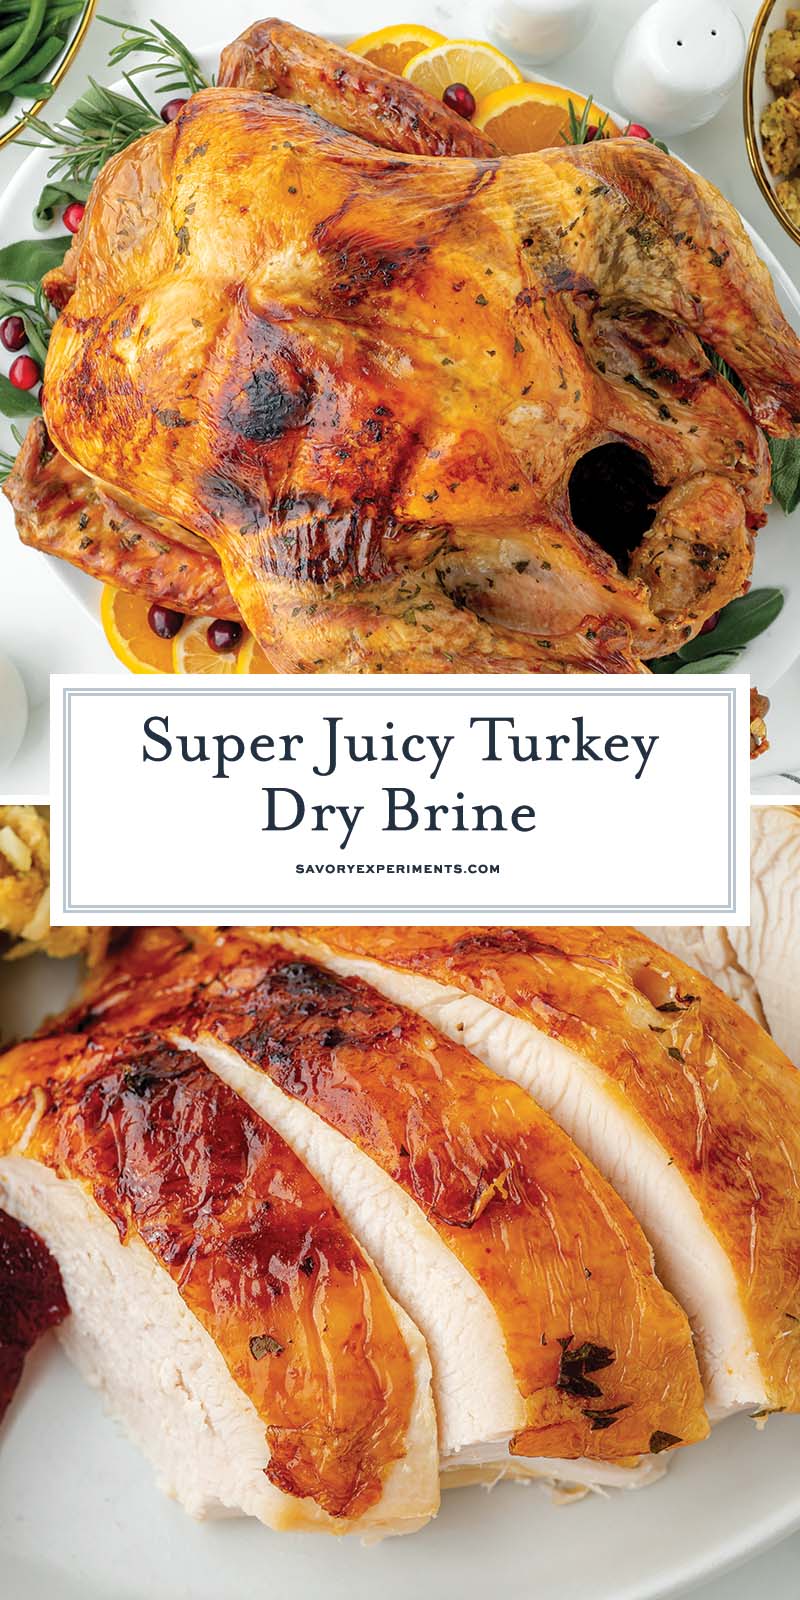
Turkeys have a reputation for being divas. They’re huge, take over your entire fridge, and if you look at them wrong they turn out dry. The good news? A simple dry brine turkey changes all of that.
Dry brining sounds fancy, but it’s really just a smart salt rub and a little patience. The salt pulls out the turkey’s natural juices, makes its own ultra-flavorful brine, and then sneaks that seasoning right back into the meat. The result is a deeply seasoned, crazy-juicy, dry brined turkey with super crispy skin—no buckets of sloshy liquid and trying to find a place to stash them.
In this post I’ll walk you through exactly how to dry brine a turkey:
- The right kind of salt (and how much per pound)
- How long to dry brine a turkey based on its size
- Whether to cover or uncover for that glass-shard crispy skin
- How to roast it without making it too salty
If this is your first time, start here, read through once, and then you’ll be ready to brine like a pro.
Turkey Brine at a Glace
Salt Ratio: Scant 1 tablespoon coarse kosher/sea salt per 5 pounds of turkey
Timing: 24 hours minimum; 3 days is the sweet spot
Covering: Covered for the first 1–2 days, uncovered the last day for crispy skin
Best For: 10–18 lb plain, non-self-basting turkeys
Cooking Methods: Roasted, fried, or smoked
What is Dry Brine Turkey (And Why it Works!)
Dry brining is a chemical process that can not be rushed. A dry brine, also known as pre-salting, is salt rub applied directly to the turkey without water. The salt mixture can be seasoned with fresh herbs, spices, citrus zests and even sugar to balance the acidity.
Dry brining draws out the turkey’s natural moisture. Salt mixes with the juices and is reabsorbed into the meat which makes a super concentrated brine solution that breaks down the muscle proteins and prevents them from squeezing liquid out while cooking.
The hands-off part of process takes a little longer than a wet brine, but is less messy and requires less space than a giant cooler or brining bag. You can dry brine for 1 day, but 2-3 is the sweet spot.
How Long Does it Take to Dry Brine a Turkey?
The length also depends on the size of your bird. Under 18 pounds can get away with 24 hours to 2 days, while over 18 should aim for 3 days. If you are making this as your Thanksgiving turkey, Christmas bird or for any other day of the week, plan ahead!
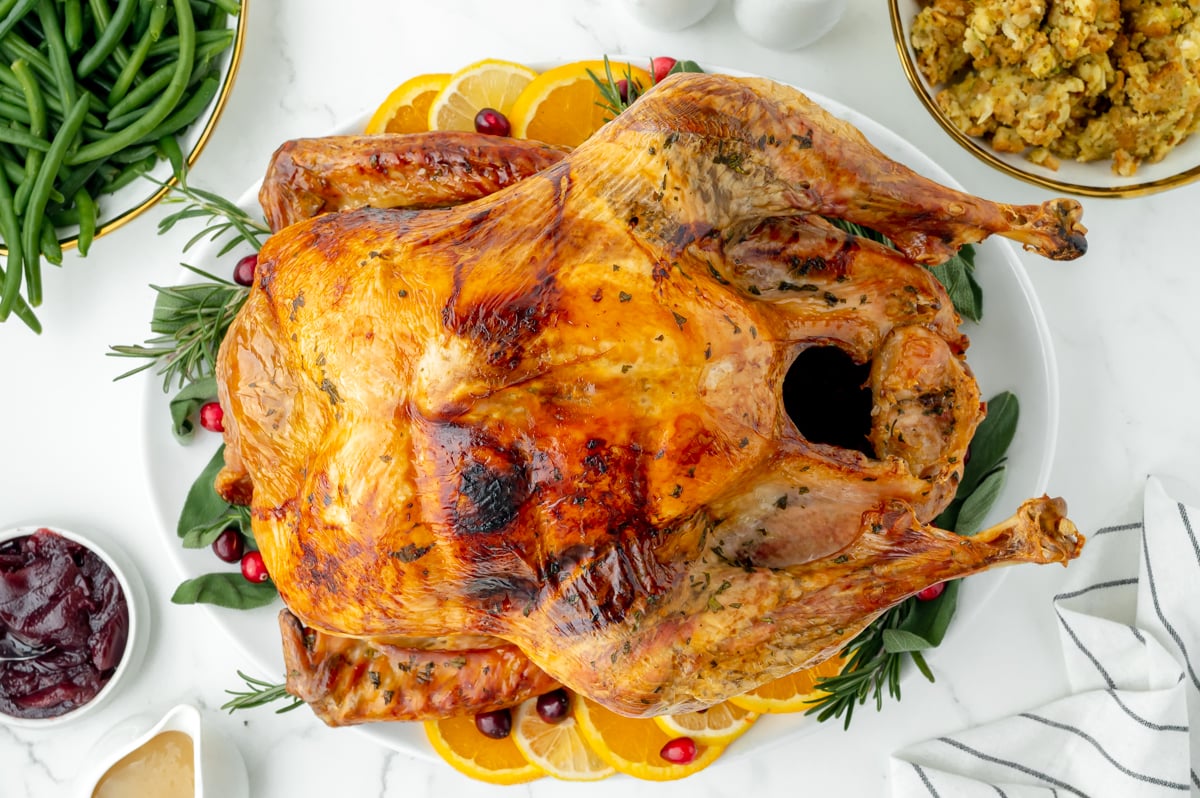
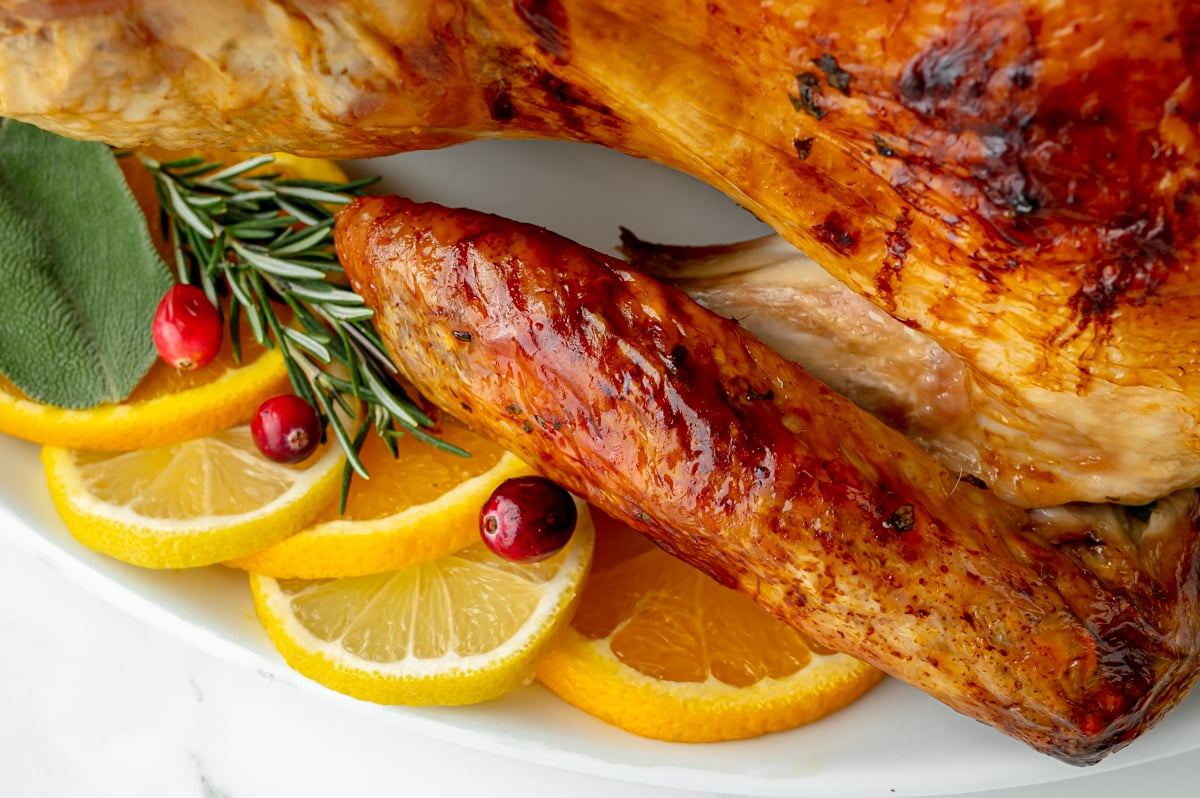
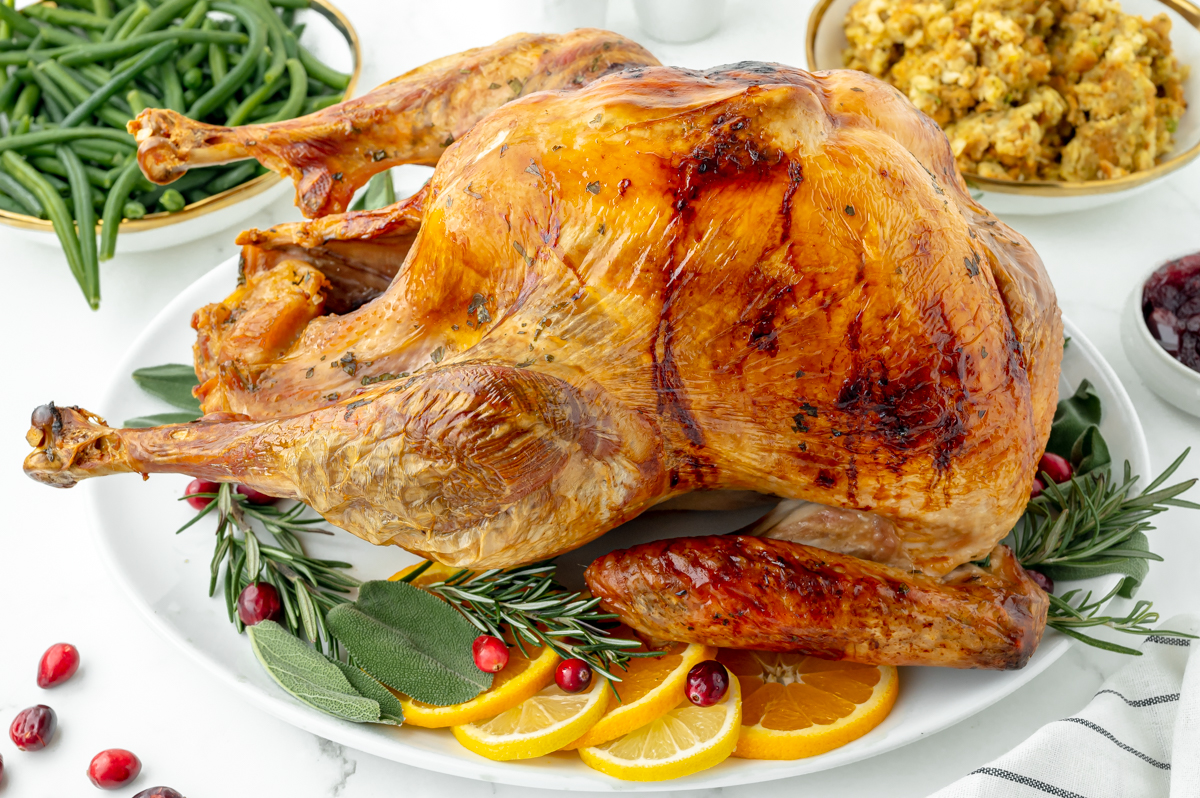
It will sit in your fridge covered for the first days (or hours) and then uncovered for the last, resulting in seasoned meat, but also super crispy skin. This method is very similar to making crispy chicken skin or making Duck a’la Orange.
It seems scary to let is sit, all exposed, but as long as you handled it properly from thawing and cooking to the correct temperature, it will be fine. Use an instant read digital thermometer for accuracy.
Is a Dry Rub the Same as a Dry Brine?
No, a dry brine is on the turkey for days, allowing a chemical reaction to happen. It will season the bird and produce its own concentrated brine. It is sometimes referred to as a salt brine or dry salt brine.
A dry turkey rub is good for throwing on right before you put the bird in the oven and will give you tasty skin, but won’t do anything to impact the rest of the meat.
Is a Dry Brine or a Wet Brine Better for Turkey?
A wet turkey brine is the most traditional of brining, but not the only method. Wet brining involves heating water with aromatics, spices, herbs and most importantly, salt.
The turkey is submerged in seasoned water for about 24 hours and then cooked. The water infuses the whole turkey with moisture and flavor. Benefits are that it is faster and you can infuses the water with more flavors than a dry brine.
A dry brine uses salt and no water. It can be seasoned with aromatics, spices and herbs, but omits the process of boiling and cooling water and also finding a vessel large enough for submerging the turkey. The flavors don’t infuse into the fibers as well as wet brining, but it is elite in creating flavorful crispy skin and beautiful browning.
The benefits of a dry brine are that it is easier, requires less prep time, less messy, takes up less space and naturally creates crispy skin. The biggest downside is that in many cases, you need to brine for even longer than a wet brine.
| Method | Pros | Cons | Best For |
|---|---|---|---|
| Wet Brine | – Super juicy, very forgiving for overcooking – Easy to infuse with lots of flavors (herbs, citrus, spices in the liquid) – Great if your turkey tends to run dry | – Requires a big container + fridge space – Messy: heavy, sloshy brine to move and dispose of – Extra step of heating/cooling brine safely – Skin can be less crispy if the bird isn’t dried really well | Cooks who want maximum moisture and don’t mind the space/mess trade-off |
| Dry Brine | – No buckets or bags—minimal mess – Takes up much less fridge space – Naturally crispier skin (especially if left uncovered at the end) – even seasoning on skin – No need to boil and cool a liquid brine | – Needs more time (ideally 2–3 days) – Requires accurate salt measuring and the right type of salt – Can be too salty if used on self-basting, kosher, or pre-injected turkeys | Cooks who want juicy meat + crispy skin with less mess and have time to plan ahead |
Dry Brine Recipe Ingredients
The ingredient list for a basic brine is short, but you have so many ways to dress it up and make it your own with our list of variations.
- Turkey– You guessed it! You’ll need a turkey. I like to go with a turkey between 10-15 pounds for a manageable size and optimal brining and cooking times. You can use a frozen turkey or a fresh turkey. If frozen, make sure it is thawed or near thawed before applying the brine. Avoid self basting turkeys or pre-seasoned turkeys that might already contain salt (they will be too salty). If you are questioning this, just read the ingredients label- it should not say salt.
- Coarse sea salt – There is an entire section on what kind of salt to use below. Please read it to avoid having a too salty bird.
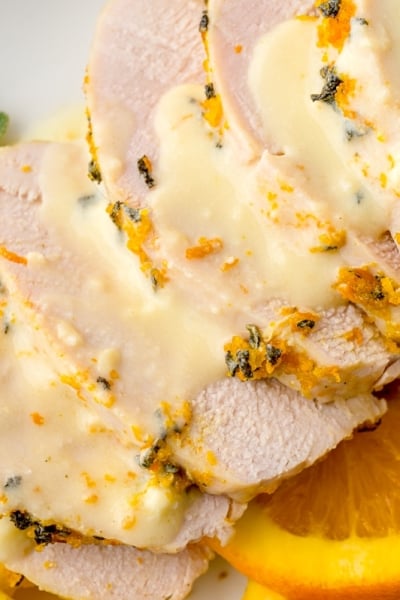
- Fresh herbs – These are optional, but provide a beautiful scent and also flavor. Keep in mind that if you are making gravy from drippings, these will also be the herbs that seasoning your gravy, so pick ones you like. And if you happen to really love herbs, double the volume. You can also use dried herbs. The ratio for dried to fresh herbs is typically 1 tablespoon of fresh to 1 teaspoon of dried. My favorites are sage, parsley, thyme, rosemary and basil.
- Garlic- Fresh garlic is best. For this recipe, I like to grate or press it versus mincing. It will be fine, give the most garlic pulp for flavor and melt right into the bird without leaving behind larger bits.
- White Pepper- White pepper is less sightly, but also more milder. Use black pepper or a blend for a brighter pepper taste.
- Brown Sugar- Sugar helps to bring out the natural flavors, but the molasses in brown sugar aids in browning the turkey. Dark brown sugar can also be used.
What Type of Salt Should I Use for Dry Brining Turkey?
We recommend using a coarse sea salt. Diamond Crystal tends to be the chef’s choice as it has the right amount of sodium without being too salty.
Morton’s has a little more sodium, so we recommend using about ¾ the amount in a recipe when using this brand.
Do not use a fine sea salt or iodized salt. It will be WAY too salty and if iodized, taste metallic.
Dry Brine Turkey Salt Ratio (Per Pound)
You’ll be using a scant 1 tablespoon coarse sea salt for every 5 pounds of turkey. Avoid a heaping spoonful, it will be too much. Remember that you do not rinse the turkey, so more is not better. More is salty.
How to Dry Brine a Turkey (Step-by-Step)
The process for making juicy turkey is simple! Read the directions for this dry brine method before starting and you’ll be fine.
- Make Rub. Combine all of the ingredients for the dry brine in a small bowl.
- Prep Turkey. Remove the turkey from the packaging. Remove the giblets and neck from inside the cavity and discard or save for another use. Remove or discard any plastic or metal cages or pop-up thermometers. Rinse the turkey under cold water. Pat the turkey dry, inside and out with paper towels so the skin is super dry. Using your fingers, gently loosen the skin from the meat around the breast and legs.
- Rub. Season the inside cavity of the turkey with 2 teaspoons of the salt solution (rub). Massage the reminder of the dry brine between the skin and meat and over the top of the skin evenly. Try your best to get it under the skin.
- Arrange Wings. Bend the wings back and tuck under the breast to secure. You can also tie them with kitchen twine if they are being stubborn.
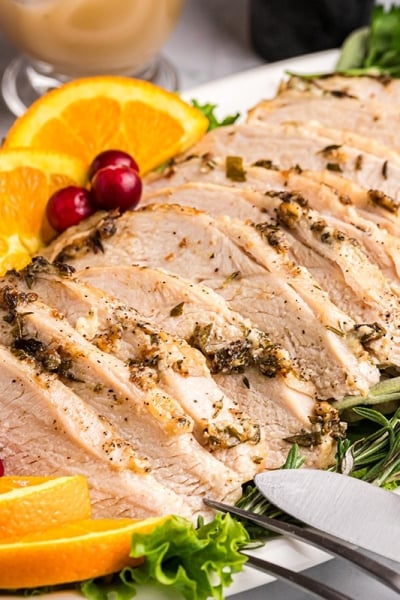
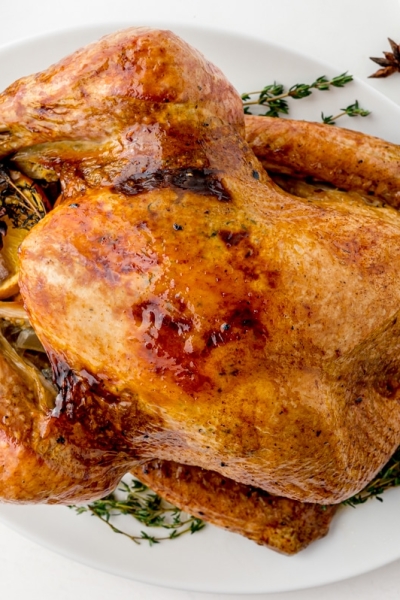
- Sit. Now the magic happens. For best results, place the turkey breast side up in a roasting pan and refrigerate covered for 2-4 days. Check daily for pooling liquid, discarding as needed. On the last day, remove cover and allow to air dry so the skin gets nice and crispy.
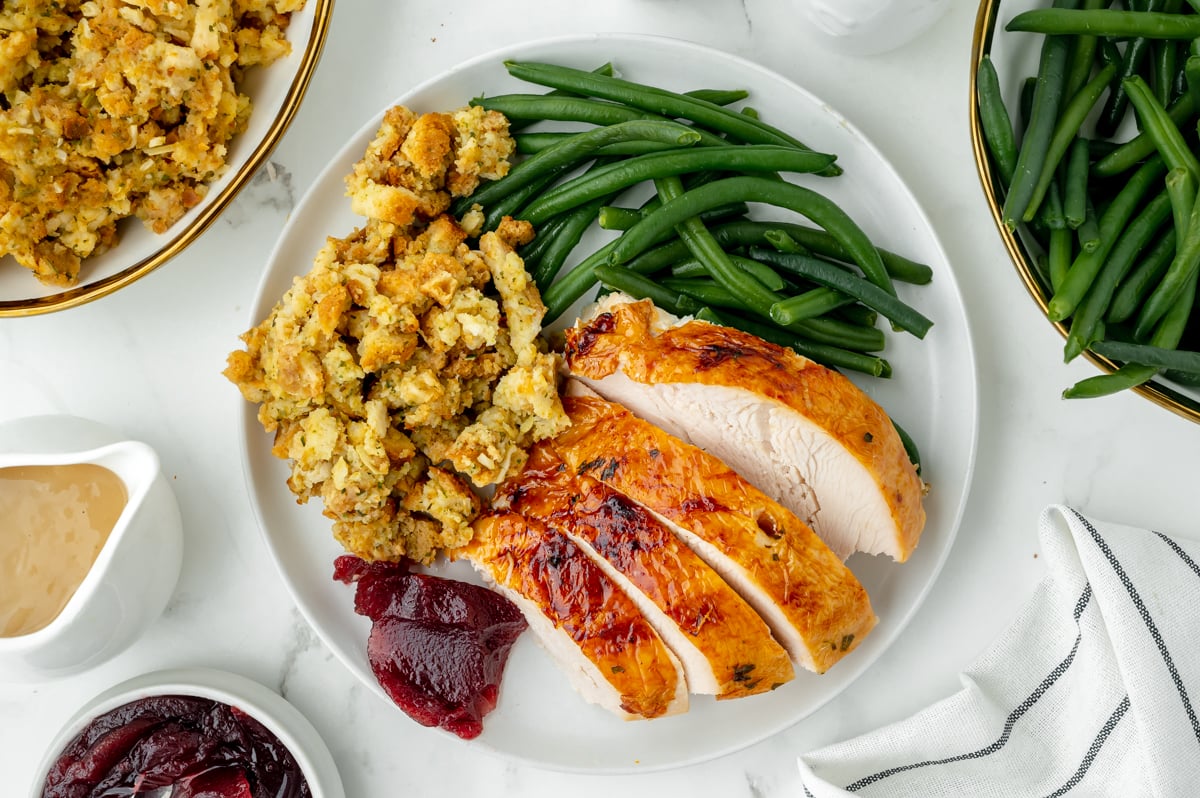
- Cook. A dry brined turkey can be roasted, fried or smoked. Even consider using a new oil-less air fryer! Do not rinse it before cooking. Simply pick back up with whatever recipe you are using, BUT omit any salt it calls for because you’ve already generously salted that turkey! We’ve included basic instructions for roasting a turkey. Make sure to cook to an internal temperature of 165°F (using a meat thermometer) and for ample time to let the turkey rest in order to retain the juices you’ve worked so hard to achieve. No need to transfer to a cutting board yet, wait until after it has rested.
- Stock– Don’t throw away the carcass! This is a great time to make homemade turkey stock which can be used in any recipe calling for vegetable or chicken stock and freezes well.
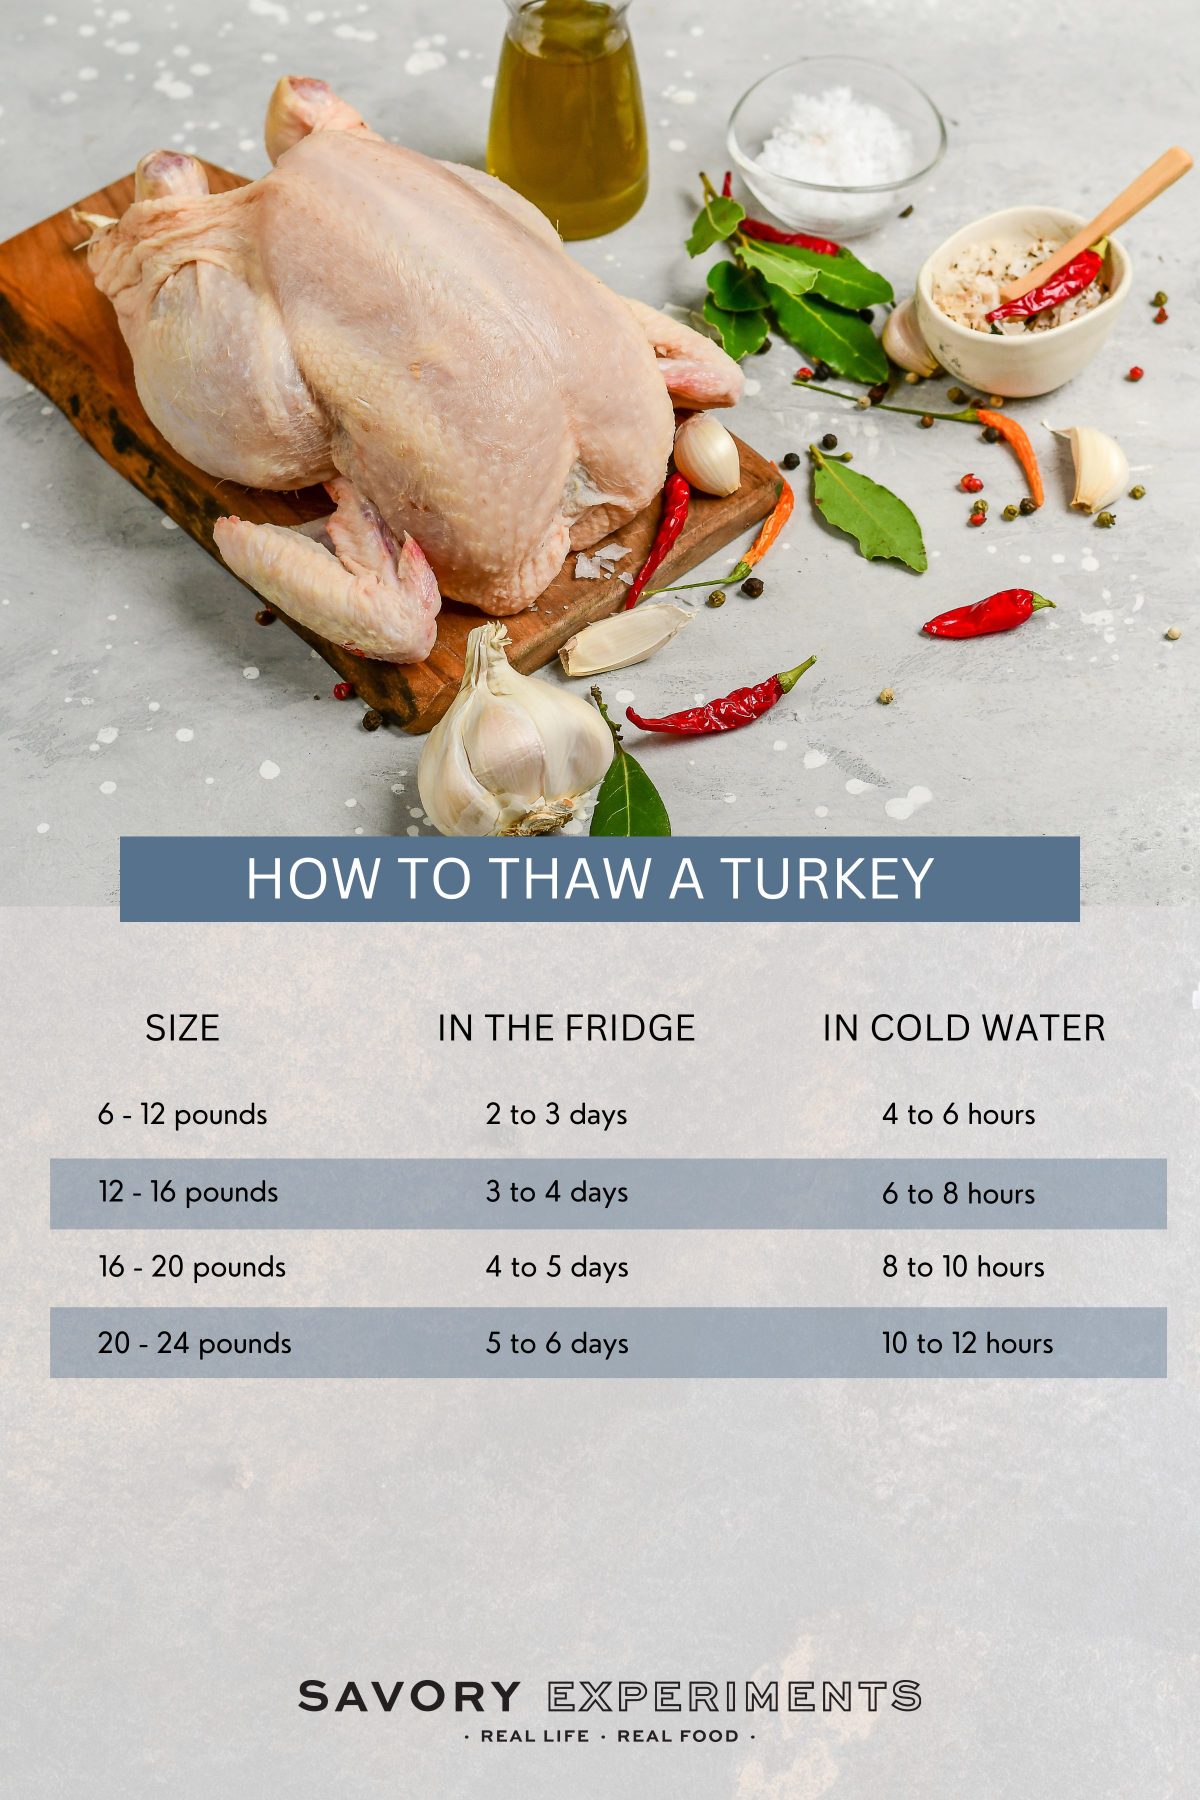
How Long to Thaw Turkey
Fridge – If you have the time (and the foresight) thaw a frozen turkey in the fridge in original packaging for 24 hours for every 5 pounds of bird. Yes, a 15 pound bird will take about 3 days to thaw.
Water Bath – If you forgot to take the turkey out or it isn’t defrosting as fast as you like, you can give it a cold water bath in the sink. Change the water every 30 minutes to around room temperature (NOT HOT). Plan for 30 minutes for every pound of bird.
Tips for Dry Brining Turkey
- Salt is the star ingredient for any brine and flavorful turkey. DO NOT USE A FINE SALT OR TABLE SALT. Use coarse salt, either Diamond Crystal or Kosher. Read above about my notes on picking salt.
- Use a plain free-roaming or heritage turkey. Do not use a Kosher, pre-seasoned or self-basting turkey, they have added salt and will be too salty.
- Make sure your turkey is defrosted or at least 75% thawed. If it isn’t fully thawed, remove pooling water from the pan or tray daily. Plan ahead so you have enough time to thaw AND brine (about 7 days for an average turkey).
- Plan for 2-3 days for dry brining. You can cook a turkey after 1 or 2 days, but it won’t reach it’s fully juicy and flavorful potential.
People Also Ask…
We recommend estimating 1 -1 1/2 pounds per person. This might sound like a lot, but remember much of the turkey is bones and other inedible parts.
After you subtract out all of that you’ll have about ¾ pound per person and a little for leftovers.
These are our favorites ways to use up turkey leftovers.
You do not need to rinse a dry brined turkey. There isn’t a huge amount of salt, like you would have in a wet brine, and rinsing it will defeat the purpose of letting it sit uncovered for a day and prevent crispy turkey skin.
Let me also say that they are many ways to make a “perfect turkey”, not just one. It might take several tries before you find the recipe that suites you and I can almost guarantee it will be some sort of combo of a few.
Listen, you can brine any piece of piece including a turkey breast. Just adjust the amount of seasoning based on the weight.
You can also use this dry brine on pork or chicken.
Much like making anything in a skillet, do not overcrowd the pan. Use a roasting pan larger than your bird and make sure the sides aren’t too tall. I suggest 2-3 inches tall. If it is any taller, you’ll risk steaming the turkey, which will make the skin soggy (and ruin the crisp!)
Also, try to use a raised roasting pan (has a wire insert or large grooves to catch the juices). Keeping it up and out of the liquids will help keep the skin crispy.
Do not use a rimmed baking sheet, the turkey will have way more juice than you’ll have space for overflow.
No, it should already be at full capacity for additional liquid and flavor, so there is really no need to use a turkey injection or use turkey seasoning. In fact, it might make it too salty. I would also recommend omitting, or at least reducing, the amount of salt in basting liquids, if using too.
Your best bet is to just roast it as-is.
No. A dry brine can’t work its magic on a fully frozen turkey. The salt needs contact with the meat, so the bird should be thawed or at least 75% thawed before you apply the brine. Use the 24 hours per 5 pounds fridge rule for thawing, then start dry brining.
I don’t recommend it. Butterball and most “self-basting” turkeys are already injected with a salty solution, so adding more salt with a dry brine can make the meat too salty. If the label lists salt, broth, or “enhanced with a solution,” skip the dry brine and use an unsalted seasoning or herb butter instead.
You can, but you’ll need to be extra careful with temperature. Stuffing slows down cooking, so make sure the center of the stuffing reaches 165°F along with the turkey. I usually recommend baking stuffing on the side so the turkey cooks more evenly and the skin stays crisp.
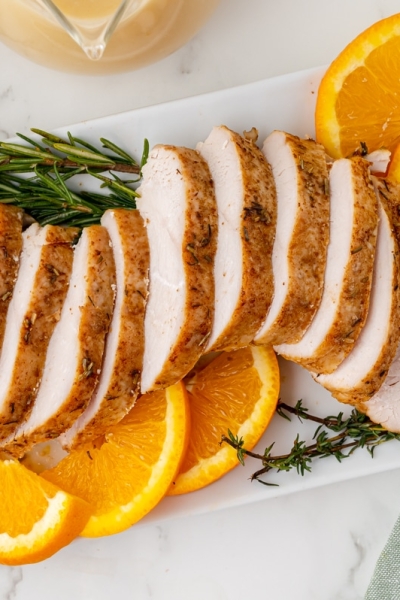
More Turkey Recipes
Here are more turkey recipes perfect for serving a crowd or a small gathering using turkey breast.
And to round out your menu, you need Thanksgiving Sides and Thanksgiving Desserts! And don’t forget the gravy!
Dry Brine Turkey (Juicy, Crispy Roast Turkey)
Ingredients
For Dry Brine:
- 15 pound turkey
- 3 tablespoons coarse sea salt *
- 1-2 tablespoons fresh herbs minced and optional
- 2 cloves garlic , grated
- 1 teaspoon white pepper , ground, optional
- 1-2 tablespoons brown sugar
For turkey:
- 2 whole carrots , cut into 2-inch pieces
- 1 white onion , cut into quarters
- 3 ribs celery , cut into 2-inch pieces
- 1 cup chicken broth, white wine or apple juice , or other liquid
- 4 tablespoons unsalted butter* , melted
Instructions
For Dry Brining:
- In a small bowl, mix together the 3 tablespoons coarse sea salt *, 1-2 tablespoons fresh herbs, minced or grated 2 cloves garlic, 1 teaspoon white pepper and 1-2 tablespoons brown sugar.
- Remove the turkey from the packaging. Remove the giblets and neck from inside the cavity and discard or save for another use. Remove or discard any plastic or metal cages or pop-up thermometers. Rinse the turkey under cold water. Pat the turkey dry, inside and out with paper towels.
- Using your fingers, gently loosen the skin from the meat around the breast and legs.
- Season the inside of the turkey cavity with 2 teaspoons of the dry brine mixture.
- Rub the reminder of the dry brine between the skin and meat and over the top of the skin evenly.
- Bend the wings back and tuck under the breast to secure.
- Place the turkey breast-side up in a roasting pan and refrigerate covered for 2-4 days. Check daily for pooling liquid, discarding as needed. On the last day, remove the cover and allow to air dry.
- Do not rinse before cooking. From here follow any recipe you like or use the instructions for roasting below, but DO NOT add additional salt.
For Roasting:
- Preheat the oven to 400°F.
- In the bottom of a clean roasting pan add the roughly cut 3 ribs celery, 2 whole carrots, 1 white onion and 1 cup chicken broth, white wine or apple juice .
- Place the turkey upside down (breast side down) on a rack in a roasting pan. Juices will run down preventing the turkey breast from getting dry, so you don't have to baste and potentially hydrate the skin and prevent it from being crispy.
- Brush the bottom of the turkey with half of the melted 4 tablespoons unsalted butter*.
- Reduce the oven temperature to 325°F. Roast for 1 hour.
- Remove the turkey and carefully turn it over, breast side up. Baste with the remaining melted unsalted butter.
- Return to the oven and roast for an additional 2 1/2 to 3 hours or until internal temperature reaches 160°F in the meaty part of the thigh and not near a bone. This will vary greatly depending on the size and shape of your turkey. Check often using a digital thermometer.
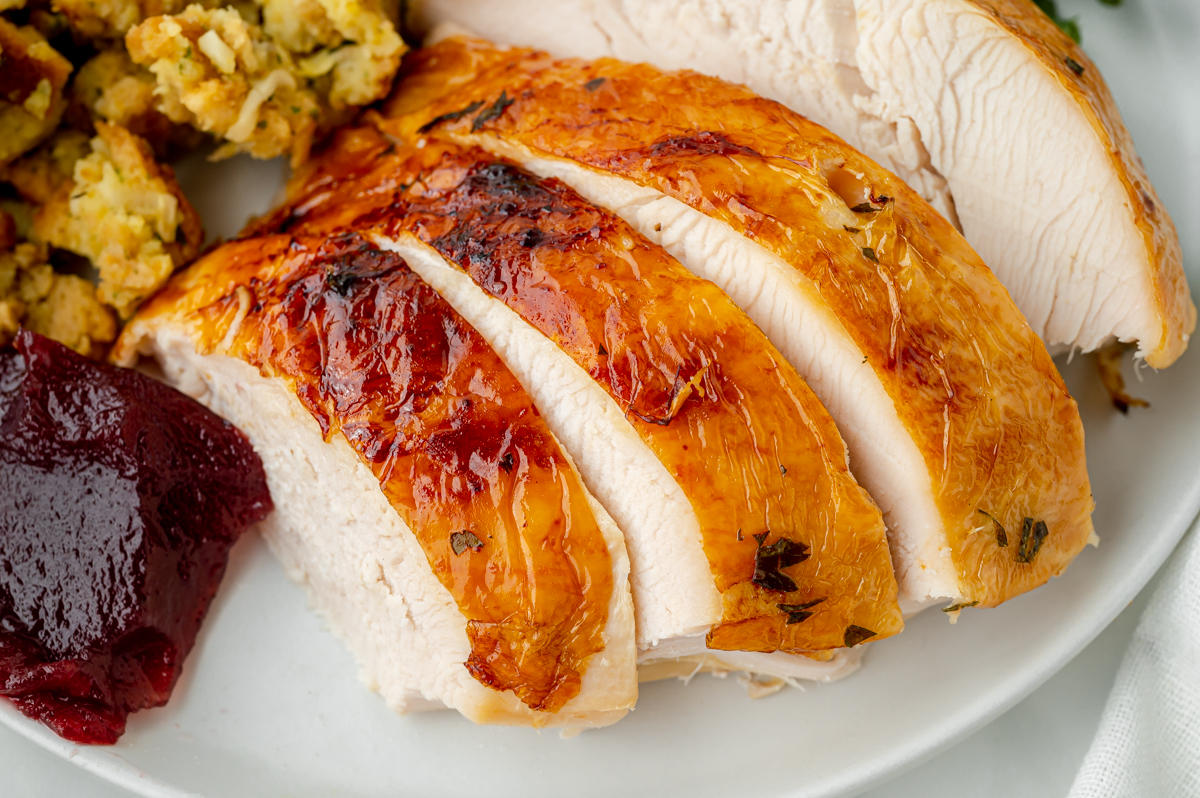
- Remove the turkey and allow it to rest for at least 30 minutes before carving. Carving too soon will release all of the juices. Turkey will hold heat fairly well, but you can tent with aluminum foil or return to the oven on the servin tray for 3-4 minutes to reheat.
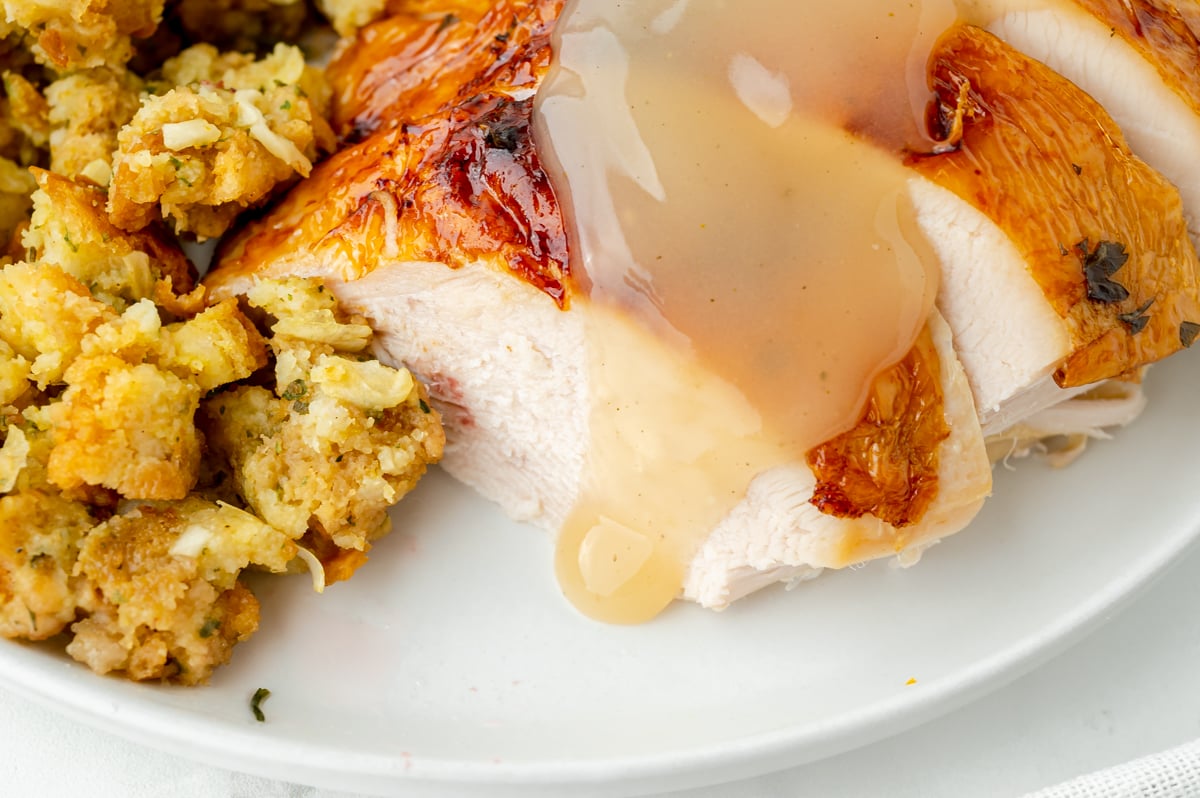
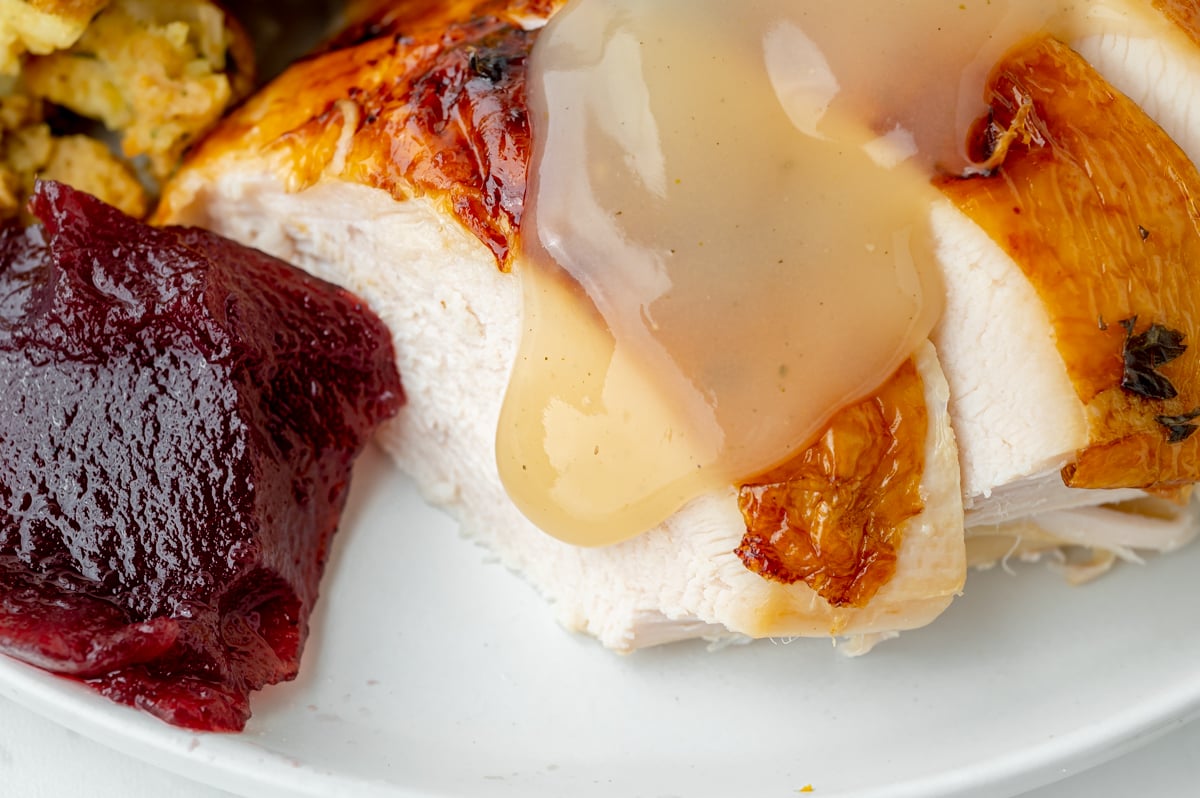
- If you do make turkey gravy, test drippings for saltiness before adding any additional salt to the gravy.
- We hope you enjoyed this recipe, come back and let us know how it was in the comments or star ratings.
Notes
Nutrition


Can you use this brine for deep fried
Turkey?
You can! We use it for ours (deep fried and infrared) for the last 10 years 🙂 Just dab it dry really good. I also use the turkey rub recipe linked to get crispy, flavorful skin.
My first time trying this and it was perfect. Our turkey was amazing, and I’ll make it this way next time, too.
Less mess, less stress! This dry salt brine is genius.
I love all of the tips and tricks here! I will definitely be using these for my next turkey.
Your dry brine turkey recipe is a real winner! It’s clear that you’ve put a lot of thought into the details, from choosing the right salt to the precise brining time. The result is a turkey that’s not just moist but also packed with flavor. The tips on handling and cooking the turkey were especially helpful, making the whole process seem less daunting. Great job on creating a recipe that turns the holiday centerpiece into something special!
I appreciate all the information in this post so that I can make the best dry brined turkey. I am looking forward to trying this method.
I like this method so much better than a messy wet brine! The turkey was so moist and the flavor was fabulous!
I am loving the dry brine option! Definitely takes up less space and taste just as good!