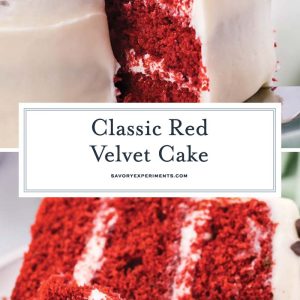
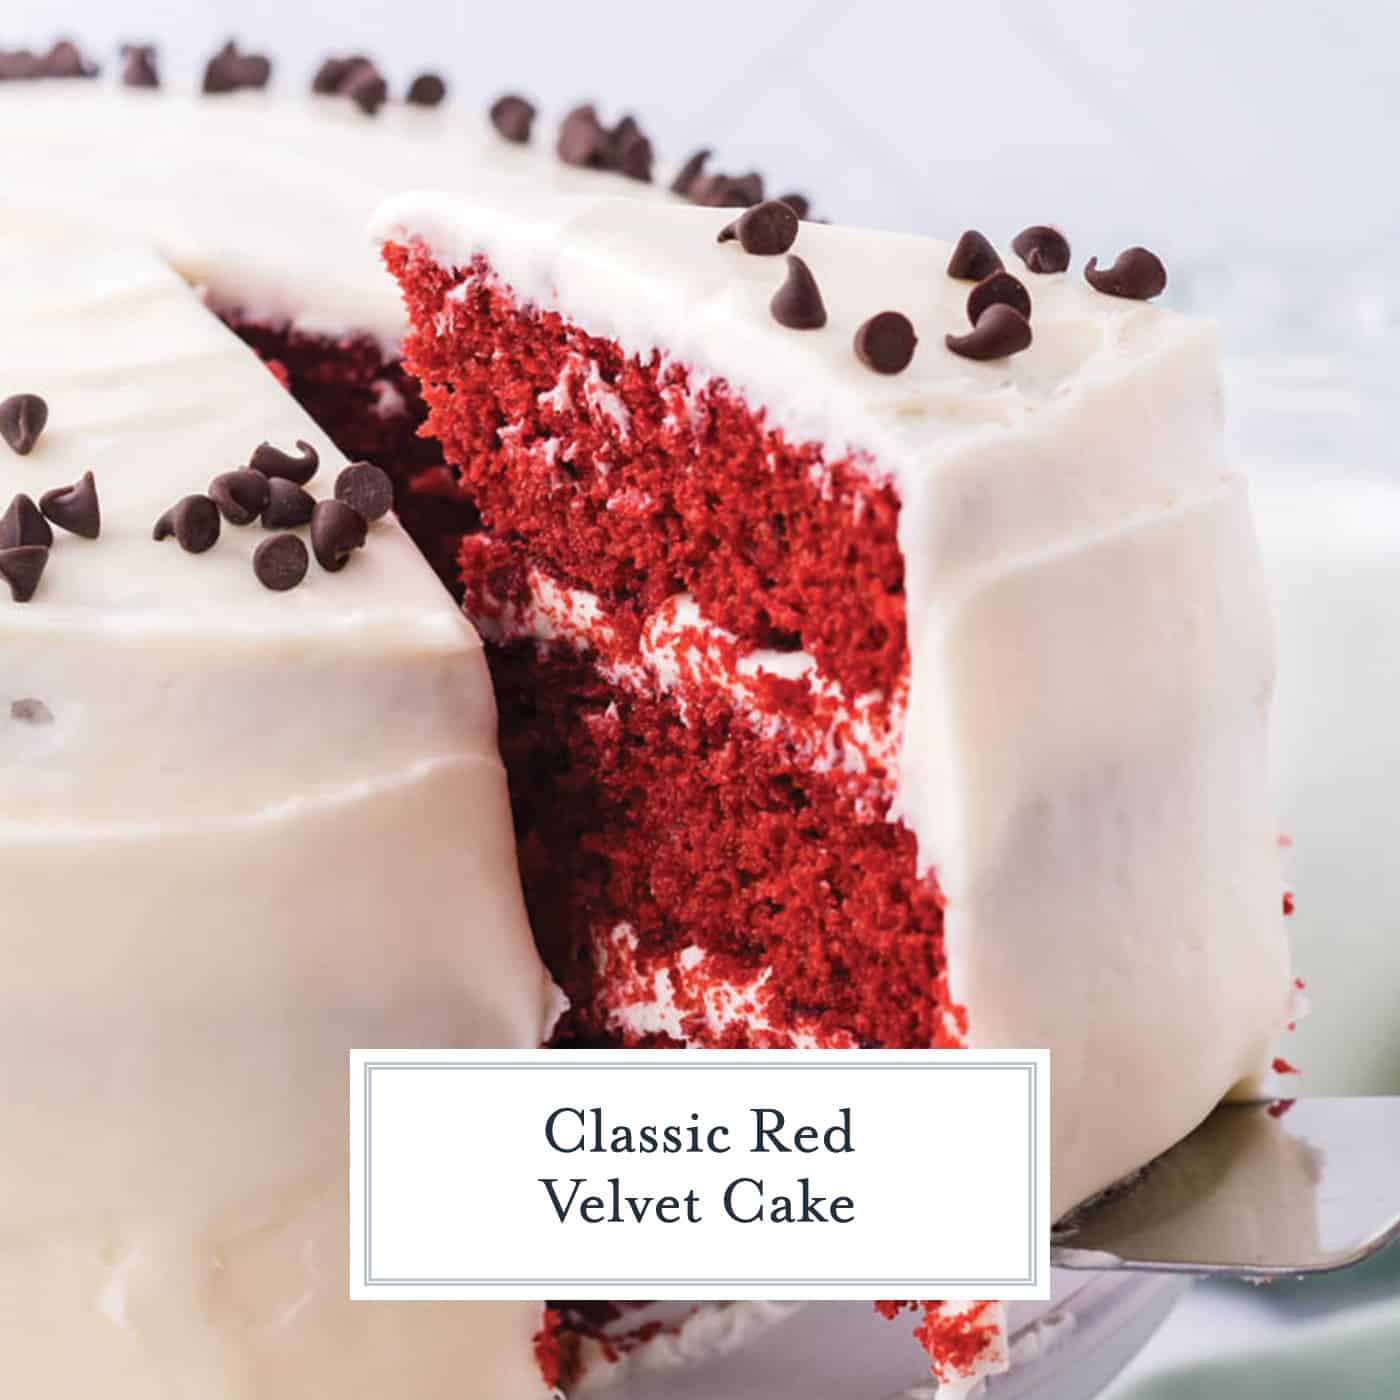
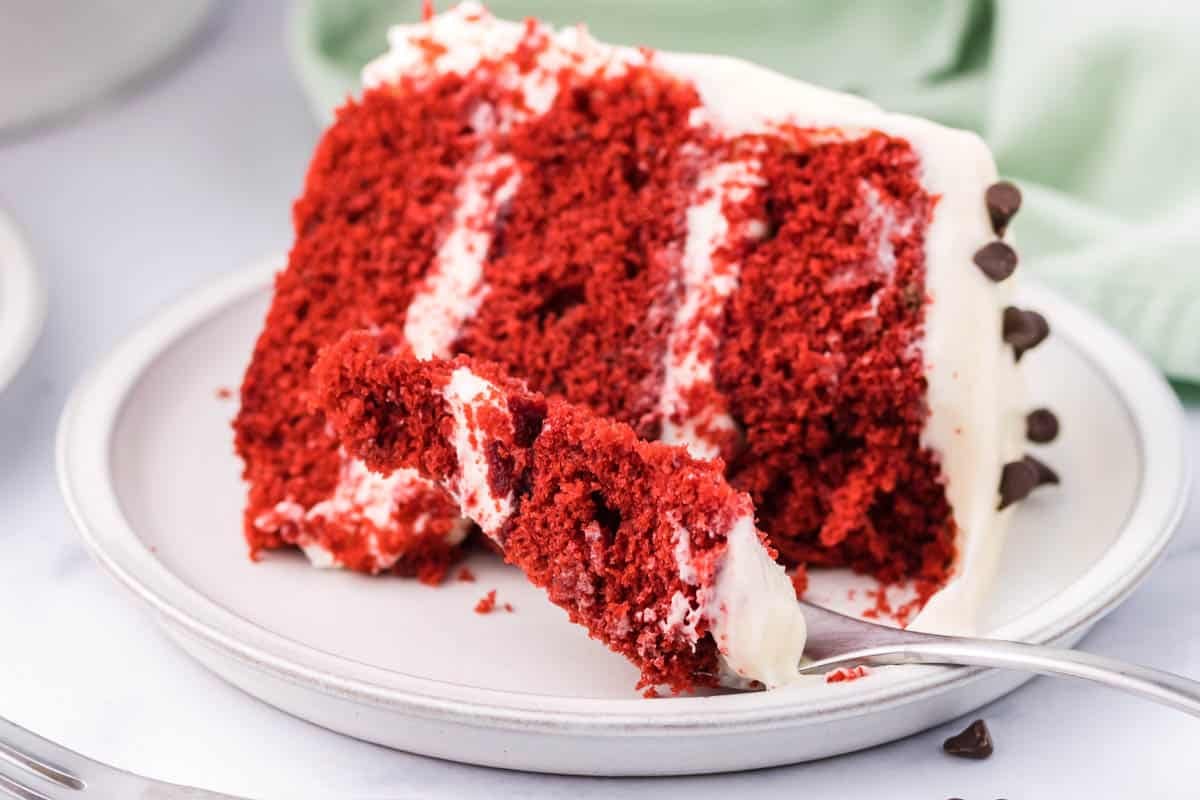
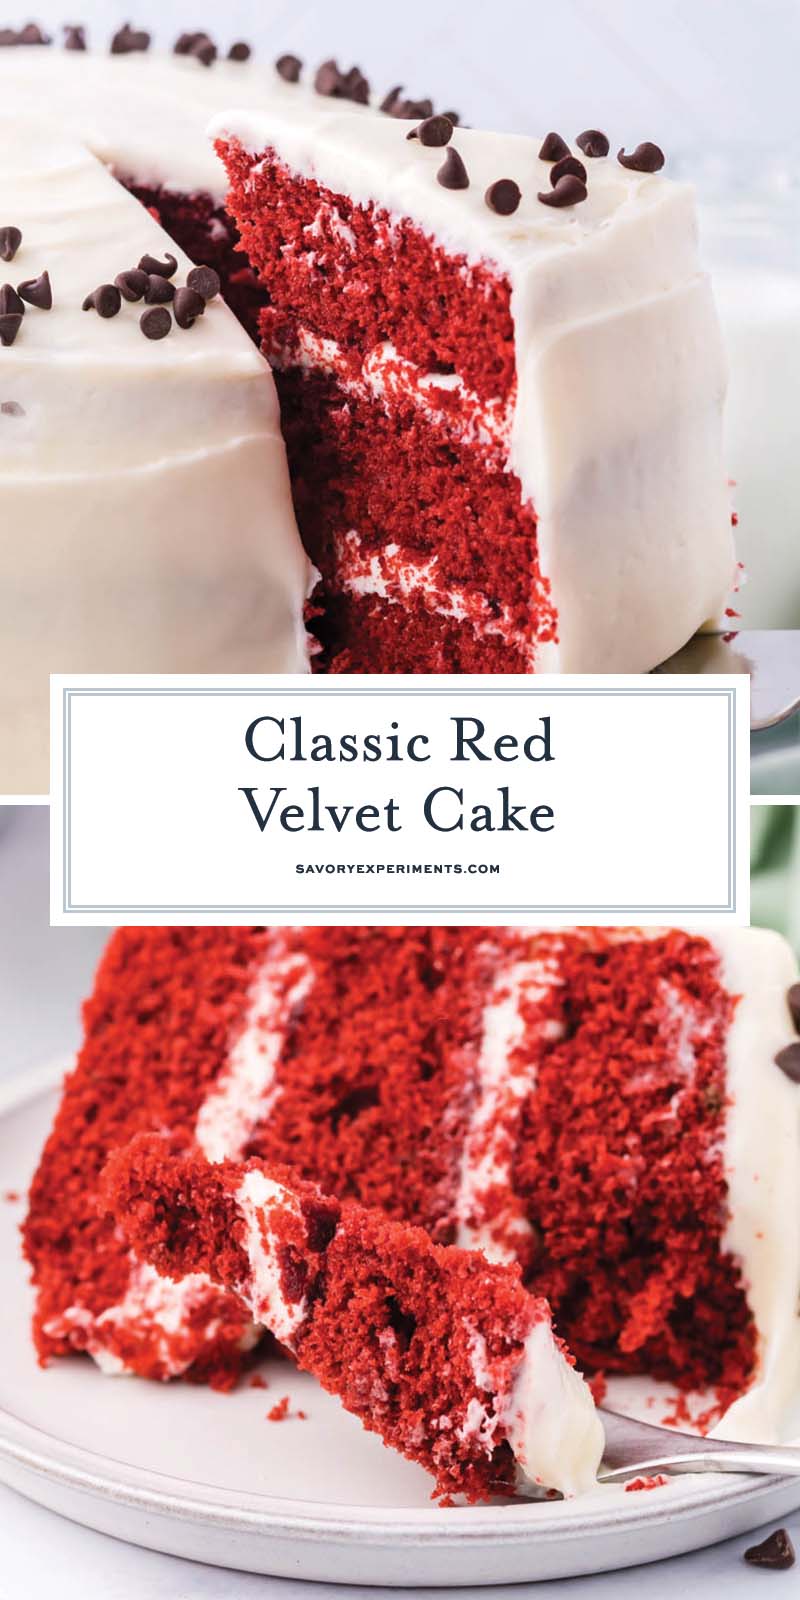
I don’t know about you, but whenever I see red velvet cake it makes me think of special occasions. It’s the kind of bright, vibrant dessert that cheers you up just looking at it.
Where Is Red Velvet Cake From?
That said, the genesis of red cake batter actually came from a time that was far from cheery. It was during WWII rationing, when sugar and other goods were hard to come by, so bakers began using beet juice in their cakes.
On an upside, though, the velvety nature of this cake came from a surprise finding in the 1800’s when bakers realized that combining cocoa with the coarse flours they used at the time would create a chemical reaction that resulted in that velvety texture.
Red velvet cake is steeped in history, from those fun facts to ongoing debates to this day of where red velvet cakes originated and who first made them. Regardless, we’re just grateful that this delicious cake exists.
From the fluffy texture of the cake to the tangy flavor of the frosting, this cake is, indeed, worthy of special occasions. The next time you want to garner some serious compliments at a party, whip up this cake — and wow your guests with a little red velvet cake trivia that you have under your belt, now, too.
Now the flavors (and colors) of red velvet spans to red velvet pancakes, red velvet cookies, red velvet cupcakes, red velvet brownies and more!
Why You’ll Love Red Velvet Cake
There are endless reasons to love this gorgeous cake that guests are bound to swoon over.
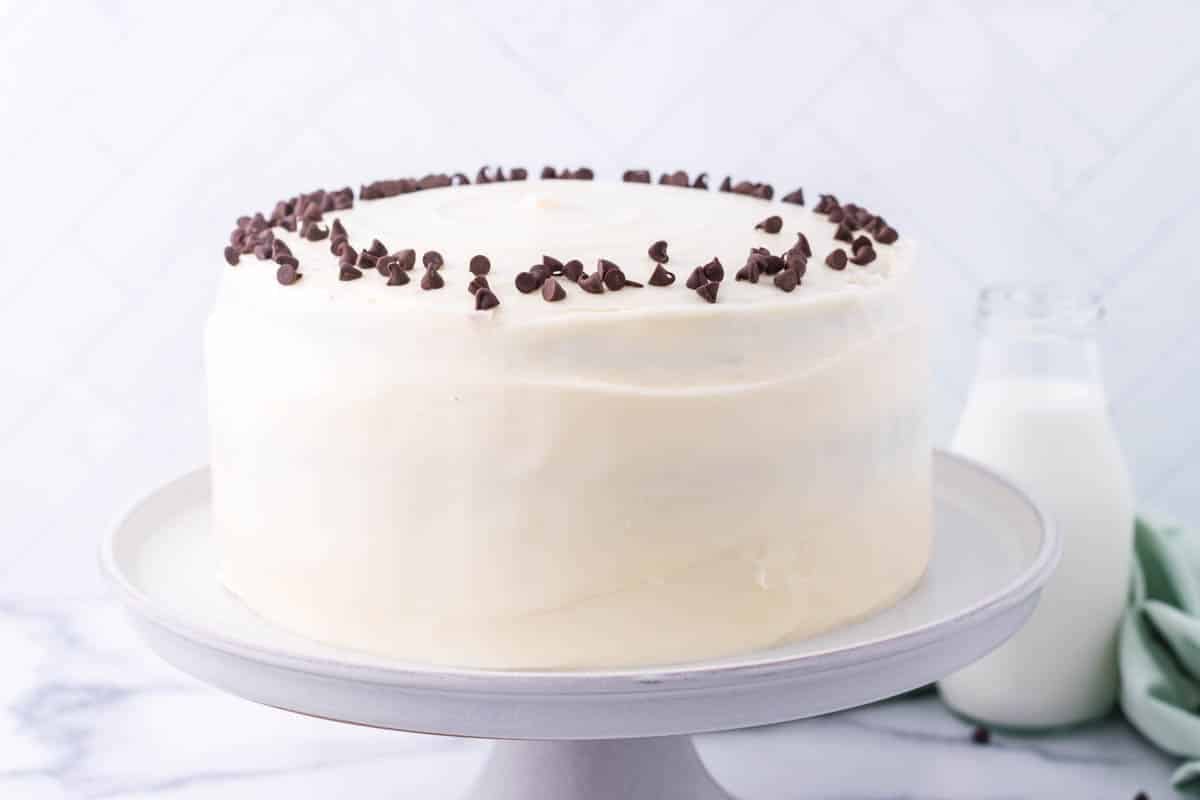
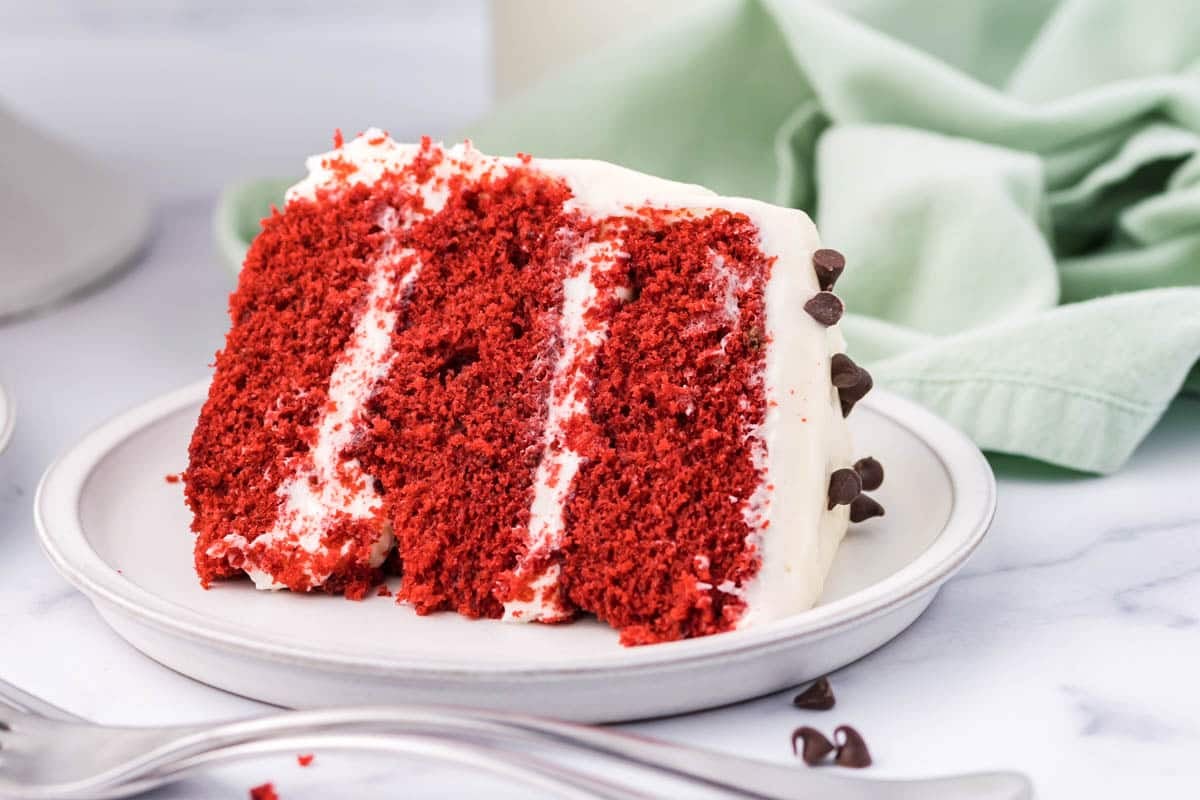
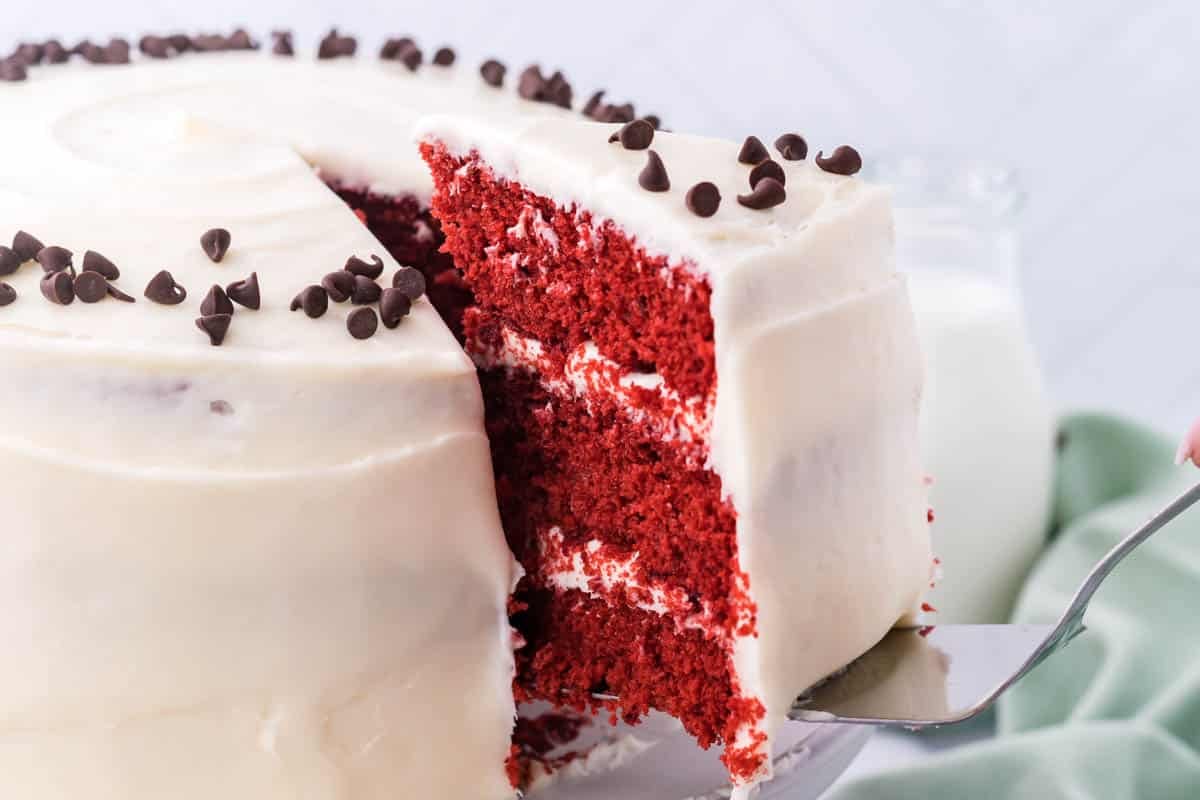
- Pretty – The bright red color of this cake against the backdrop of the bright white icing makes it a vibrant addition to any dessert table.
- Festive – For holidays like Valentine’s Day, Christmas, or the 4th of July, there are few cakes as festive as this one.
- Delicious – The silky, tangy cream cheese frosting mingles so perfectly with the rich, moist texture of the cake.
Ingredients
When you’re preparing to bake your red velvet cake, make sure to take all of your ingredients out of the refrigerator so they can come to room temperature. And don’t skimp on the fat on the dairy products — using full fat versions of cream cheese and cream is what makes this cake so moist and decadent.
Cake
- All purpose flour – This ingredient helps the cake to rise. Make sure to use all-purpose and not another variety you may have in your pantry (unless you’re using flour alternatives)
- Unsweetened cocoa powder – Cocoa powder gives this cake a rich flavor.
- Baking powder – Another ingredient that’s an important leavening agent, be sure to use this and not baking soda.
- Espresso powder – While optional, espresso powder helps to deepen the flavors of the cake.
- Salt – Salt elevates the flavor of baked goods. You can use whichever variety you prefer but your table shaker will do the trick.
- Butter – Softening the butter will help it to mix more easily.
- Granulated sugar – The size of the granules of this type of sugar makes them perfect for baking cakes. They dissolve quickly when mixing the batter.
- Vegetable oil – If you don’t have vegetable oil on hand use another that you have on hand, like coconut oil. You can even swap in applesauce.
- Vanilla extract – Using pure vanilla extract will definitely impart more flavor than if you use an imitation variety.
- Eggs – Large eggs are always standard for baking and are exactly what you need for this recipe.
- Buttermilk – This acidic milk helps to make the cake light and moist.
- Red food coloring – We need that classic red velvet cake color. Using liquid food coloring (instead of gel food coloring) will make it easier to mix.
Frosting
- Cream cheese – Bring the cream cheese to room temperature. It will mix more easily with the other ingredients.
- Butter – Use unsalted butter and bring it to room temperature at the same time as the cream cheese.
- Powdered sugar – Also known as confectioner’s sugar, this ingredient is what makes the frosting silky and sweet.
- Vanilla extract – Use the store-bought kind or find out how easy it is to make your own homemade vanilla extract.
- Heavy whipping cream – You’ll want to make sure to get the heavy variety and not a lower fat version.
How To Make Red Velvet Cake
Making this cake is easy and fairly simple. While the cake is baking (or cooling), whip up the frosting so that it’s ready to spread after the cake cools.
- Add the butter and sugar to a large bowl of a stand mixer and beat together until smooth.
- Pour in the vanilla extract and the oil and mix until they are just combined.
- Pour all of the dry ingredients into a medium bowl. Whisk them to completely combine them all together.
- Run the stand mixer on low speed and slowly add ⅓ of the flour mixture to the bowl, mixing until all of the dry ingredients are moist.
- Next, add half of the buttermilk while continuing to mix.
- Alternate between adding the dry ingredients and the buttermilk until all ingredients are incorporated, mixing continuously throughout the process.
- Then, add the food coloring.
- Once the food coloring is completely combined in the batter, pour the batter into the three cake pans prepared with cooking spray, scraping the bottom of the bowl to get all of the batter into the pans. Be sure to divide batter evenly between the pans.
- Bake until the cakes pass the toothpick test (coming out clean after being inserted in the center).
- Allow the cakes to cool on the countertop in the pans until they are cool enough to transfer them to a wire rack.

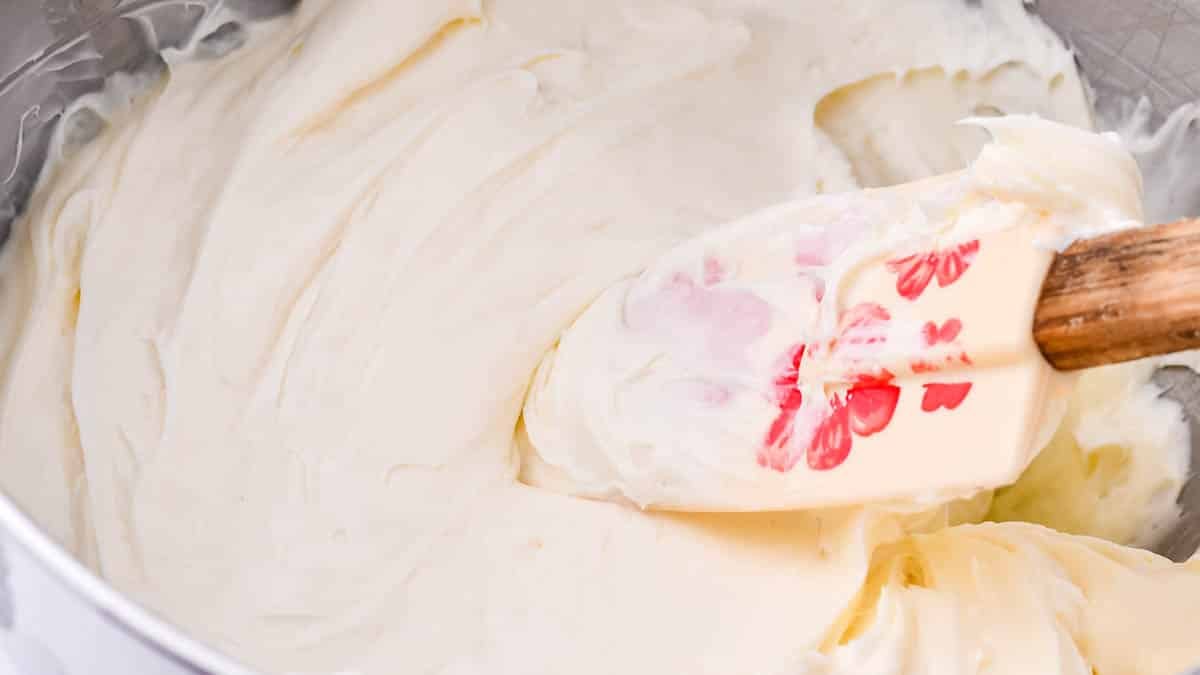
- Now the frosting. Begin by adding the butter and cream cheese to a large bowl in a stand mixer and beat until smooth.
- Place the mixer on low speed and pour half of the confectioner’s sugar into the cream cheese and butter mixture. Continue mixing until the sugar is completely combined.
- Then, add the rest of the sugar as well as the wet ingredients (vanilla and heavy cream), continuing to mix on low.
- Once ingredients are all combined, move the speed to high and continue to beat until the frosting is fluffy.
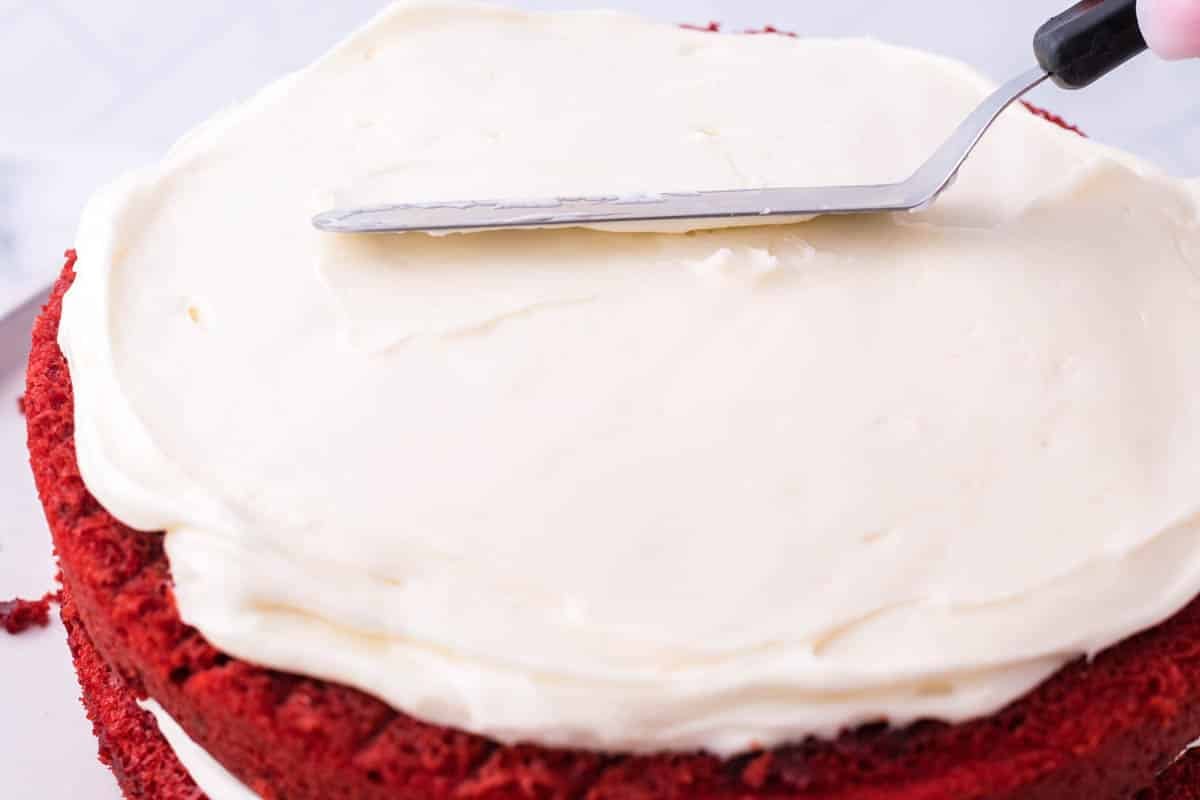
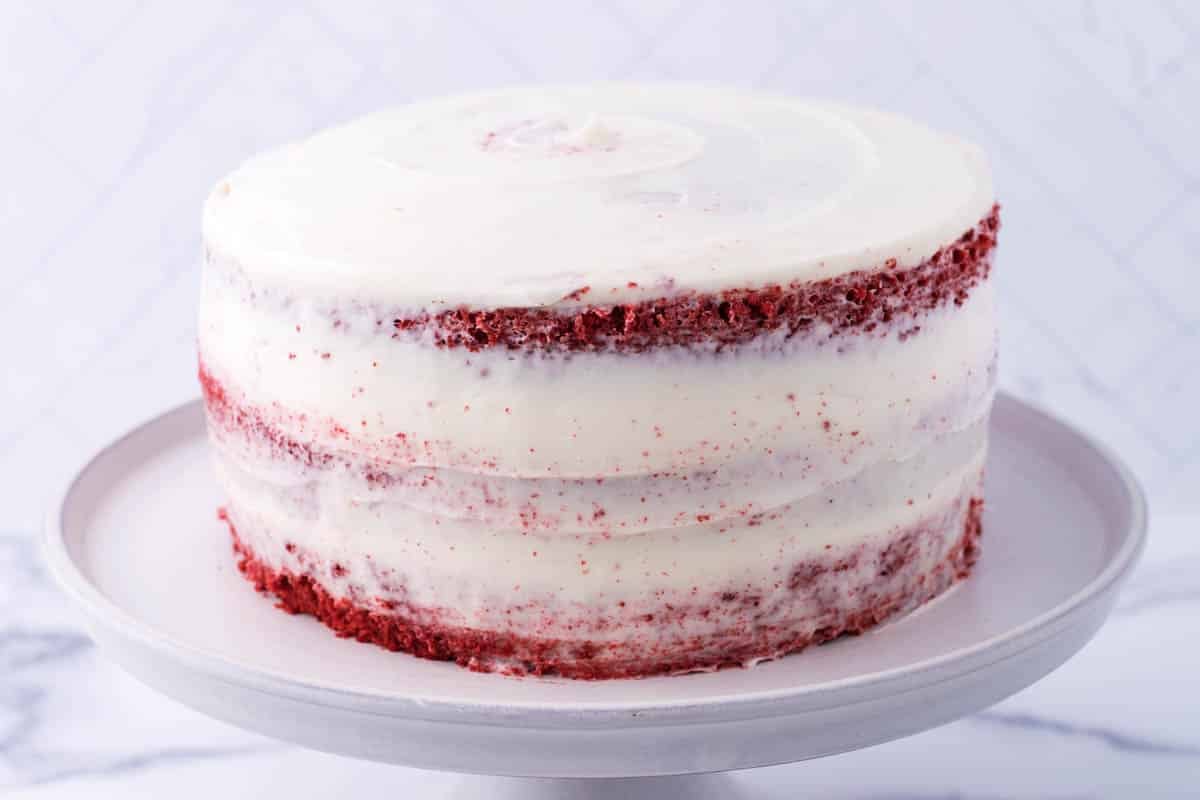
- Once the cakes have cooled completely, assemble them by first placing one layer of the cake face down on a serving dish or cake tray. Spread a portion of the frosting on the cake, ensuring that it is even and smooth.
- Repeat with the second cake and then the third.
- After all of the red velvet cake have been layered, use half of what is left of the frosting to cover the outside of all of the cake layers as well as the top.
- Briefly refrigerate the cake before then applying the remaining frosting for a smooth finish.
- Garnish the top of the cake, if you choose, with anything from nuts to berries.
Variations
While this red velvet cake is delicious as it is, there are plenty of ways to dress it up, too.
- Cocoa powder – Make your cake even more rich by adding cocoa powder.
- Chips – Gently fold chocolate chips into the cake batter before baking. You can also melt them and drizzle the chocolate over the cake before serving.
- Nuts – Crush your favorite nuts and sprinkle them over the finished cake.
- Extracts – Add nutty flavor with almond extract or rich coffee flavor with coffee extract.
- Fruit – Garnish the cake with berries like strawberries, raspberries, or blueberries. You can also make sugared cranberries to make it extra special.
- Flour – If you can’t have white flour (or you’re avoiding it) swap it out and use your favorite alternative flour instead.
- Cupcakes – All you need to transform this recipe from its cake form into red velvet cupcakes is a muffin tin or two.
Storage, Make Ahead and Freezing
Because of its cream cheese frosting, always make sure to store red velvet cake in the refrigerator or freezer.
Make-Ahead: You can make either the cake or the frosting ahead to save time on the day you want to serve it. Just store them, covered, in the refrigerator.
Refrigerator: Store leftover cake in an airtight container or covered with plastic wrap for up to 3 days in the refrigerator.
Freezer: You can store red velvet cake, either frosted or unfrosted, in the freezer for up to 3 months.
More Cake Recipes
Let them eat cake!
- Red Velvet Brownies
- German Chocolate Cupcakes
- Easy Pineapple Upside Cake
- Lemon Blueberry Cake
- Angel Food Cake
- S’mores Cake Recipe
- Banana Pudding Layer Cake
Applesauce Cake
Banana Pudding Cake
Gooey Butter Cake
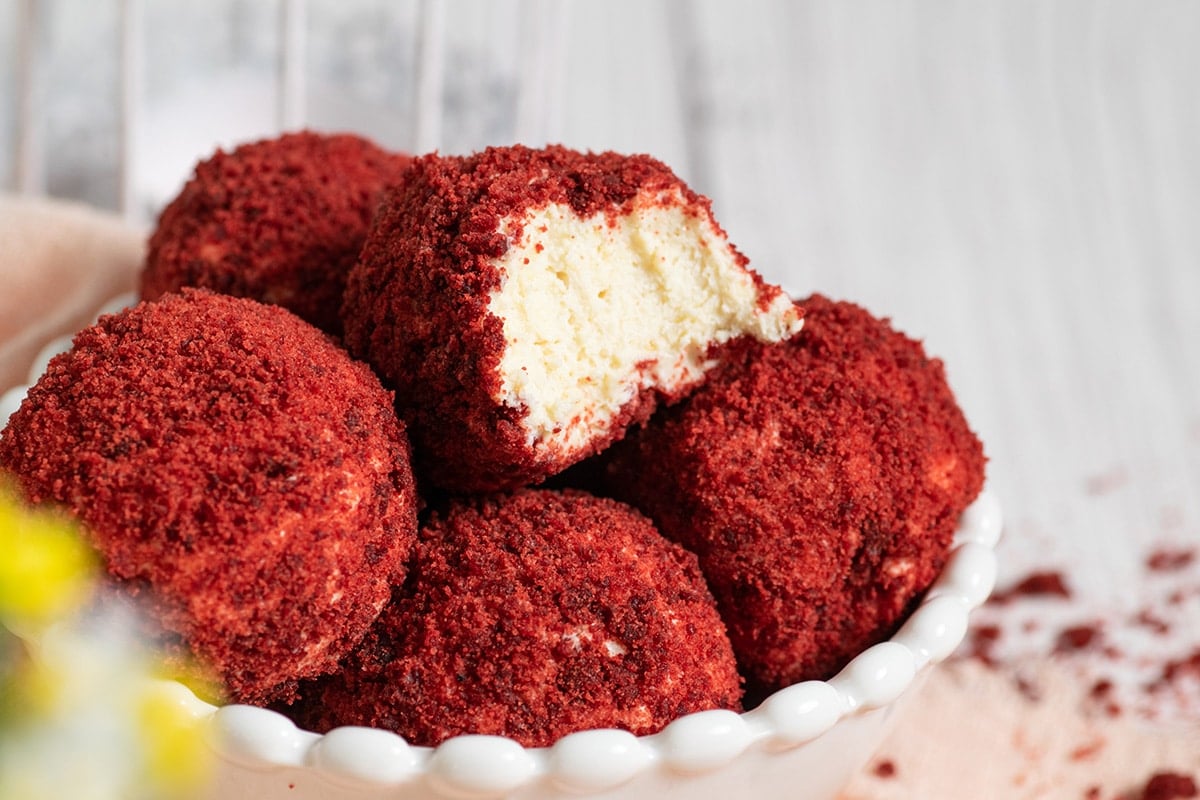
Red Velvet Cheesecake Bites
Red Velvet Cake
Ingredients
Cake
- 2 1/4 cup all purpose flour
- ¼ cup unsweetened cocoa powder
- 2 ½ teaspoons baking powder
- ½ teaspoon espresso powder , optional
- ½ teaspoon salt
- ½ cup butter , softened
- 1 ½ cups granulated sugar
- ½ cup vegetable oil
- 2 teaspoons vanilla extract
- 4 large eggs
- 1 cup buttermilk
- 4 teaspoons red food color
Frosting
- 16 oz. cream cheese , softened
- 1 cup butter , softened
- 6-8 cups powdered sugar
- 2 teaspoons vanilla extract
- 2 Tablespoons heavy whipping cream
Instructions
- Preheat oven to 350 degrees Fahrenheit and prepare three 8-inch cake pans by spraying generously with non-stick spray and place a round of parchment in the bottom of each. Set aside.
- In a stand mixer or with a hand mixer, beat the butter and sugar together until smooth.
- Add in the oil and vanilla extract and mix until just combined. Add eggs, mixing until combined.
- Add the buttermilk to a liquid measuring cup and set aside.
- Add the flour, cocoa powder, baking powder, espresso powder, and salt to a medium bowl and whisk to combine.
- Add 1/3 of the dry mixture to the stand mixer and mix until no dry spots are remaining. Add half of the buttermilk and mix well.
- Continue alternating until all the dry ingredients are incorporated.
- Add the food color last and mix until the color is well incorporated.
- Divide the batter evenly between the three cake pans and bake for 18-20 minutes until a toothpick inserted in the center of each cake comes out clean.
- Remove from the oven and allow to cool in the pan for about 10 minutes then transfer to a wire rack to cool completely.
- Once the cake layers are cool. Make the frosting by adding the butter and cream cheese into the bowl of a stand mixer and mix for 3- 5 minutes until smooth and fluffy.
- Add half of the powdered sugar and mix well until combined.
- Add the remaining powdered sugar, vanilla, and heavy cream and mix on low until combined. Increase the speed to high for 1-2 minutes until fluffy and smooth.
- To assemble: Take on cake layer and place face down on a cake tray. Add about 1 ½-2 cups frosting on top of the cake and smooth. Continue with each cake layer.
- Once you have used all the layers, take half of the remaining frosting and smooth all over the outside of the cake.
- Place the cake in the refrigerator for 15-20 minutes to allow the frosting to set slightly.
- Remove from the refrigerator and smooth the remaining frosting over the outside of the cake.
- Serve immediately or keep stored in the refrigerator until ready to serve.
- If you've tried this recipe, come back and let us know how it was in the comments or star ratings.
Nutrition


I suggest including the recipe of Panjgau a traditional hindu sweet made from gau-mutra, gau-gobara, milk, butter and honey. If you need any more info on this sweet please hit me up. Also, sice it is an ancient sweet not much information is available on the net.
Can you replace the coffee with chocolate pudding powered since I don’t have coffee in my home
Just omit it- the coffee is to enhance the natural chocolate flavors.
Now, this is a red velvet cake! Perfect color and texture, a true classic! I look forward to making this recipe soon.
I won’t have to worry about leftovers for long in my house with this cake.
Such a light and fluffy cake and I really love the frosting – so rich, creamy and decadent.
This was amazing! I actually added a little bit more espresso powder because I like to be extra! So good.
I had never added espresso powder to my red velvet cake before but I think that is what made this extra delicious!