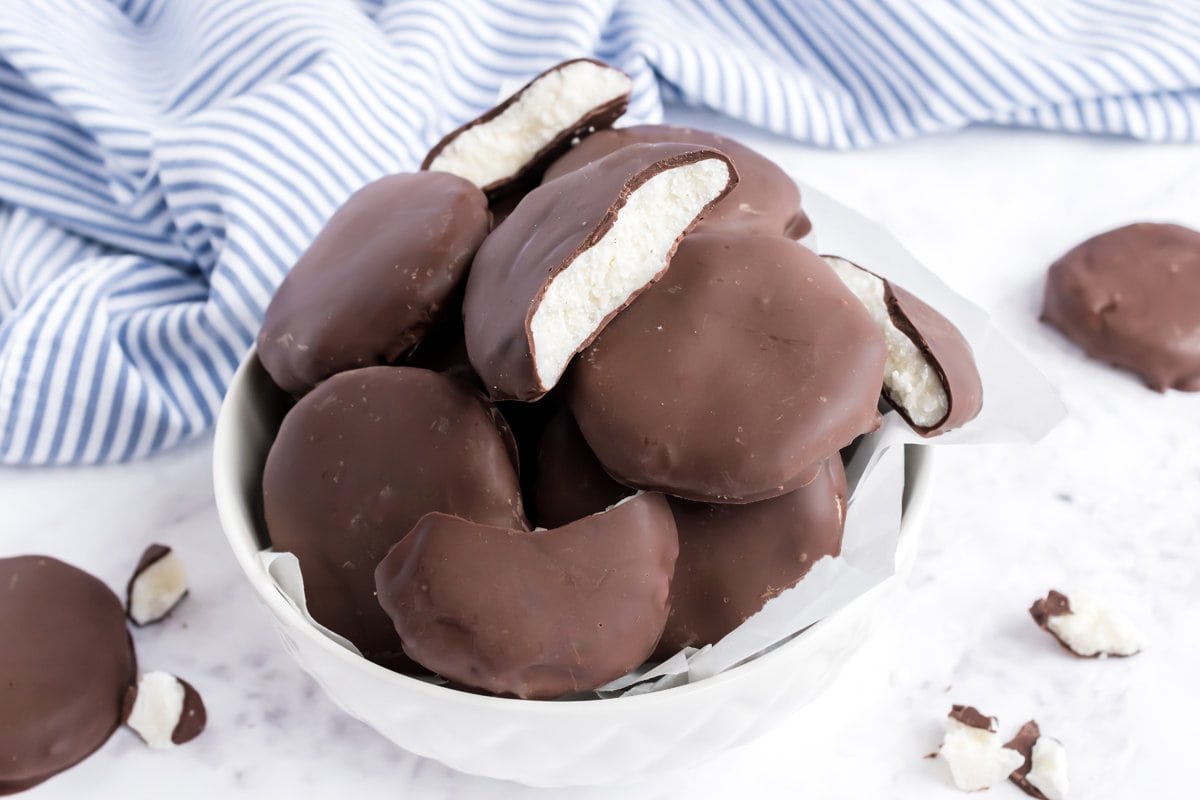
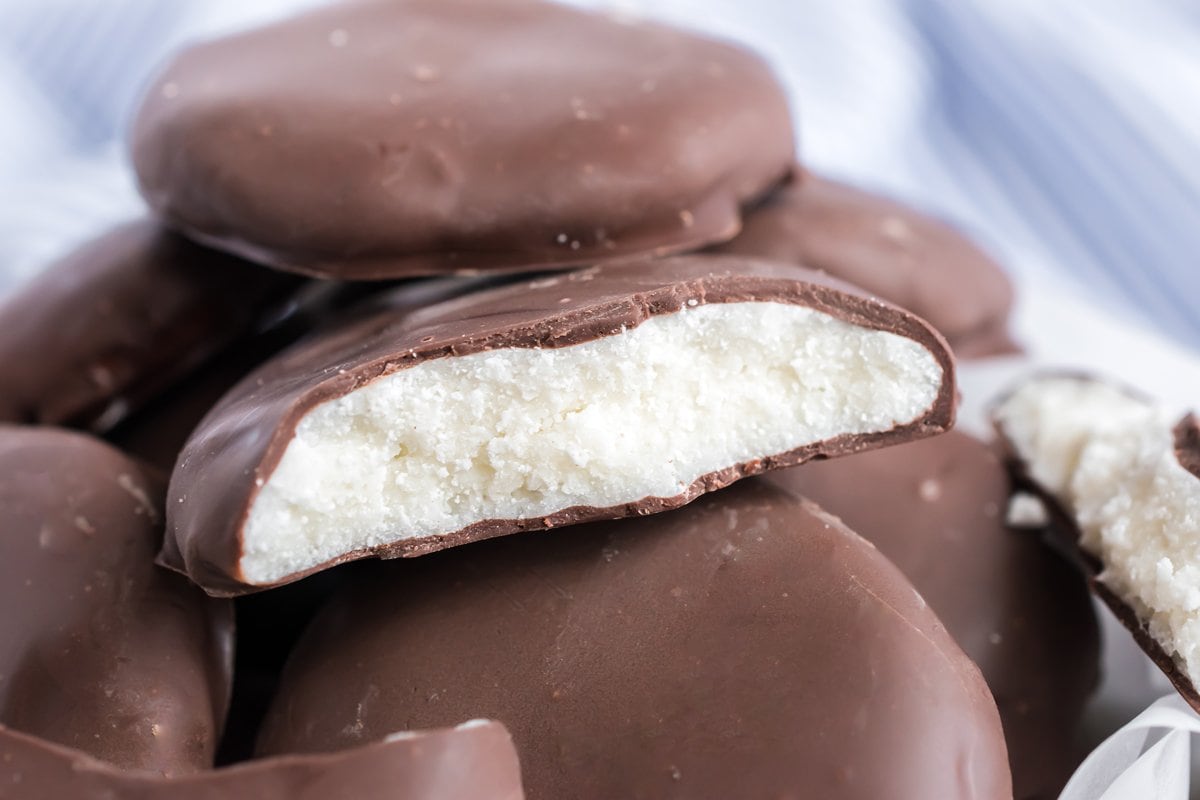
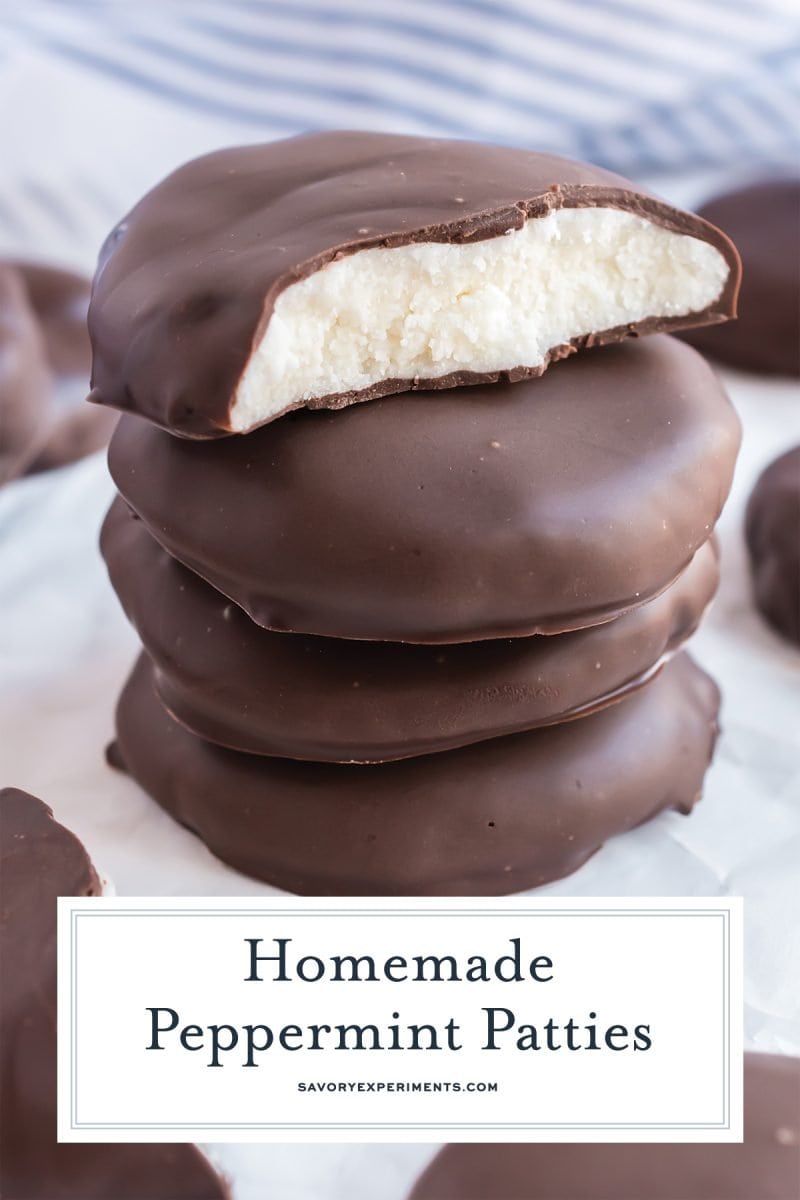
With a cool and creamy peppermint center enrobed in a layer of chocolate, this Homemade Peppermint Patty recipe is so easy to make! It only uses 4 ingredients and can be customized for any holiday or event.
Ingredients
The ingredients to make these candies are actually very simple and eliminate any high fructose corn syrup or other additives that you might find in store-bought York peppermint patties.
- Sweetened Condensed Milk – We use this to give the filling its signature creamy consistency.
- Peppermint Extract – Be sure to use peppermint instead of mint extract for just the right flavor.
- Powdered Sugar – Using this fine sugar gives the filling the perfect texture.
- Dark Chocolate Candy Melts – These are easy to melt and help the coating to harden perfectly.
Variations
These simple cookies are easy to tweak to create your own signature peppermint cookies.
- Decoration – Drizzle the cookies with melted white chocolate chips or add sprinkles to the top.
- Peppermint Candy – Fold crushed candy canes or peppermint candies into the filling mixture.
- Chocolate – Use any variety of chocolate that you like for the coating.

How to Make Homemade Peppermint Patties
The process of making a homemade peppermint patty is really simple, but I’ll share all of my tips and tricks for you to get the best peppermint patties ever.
- Combine ingredients for the patty filling. First, blend sweetened condensed milk and peppermint extract with powdered sugar until the mixture has no lumps. The dough should be stiff and easily workable with your hands.
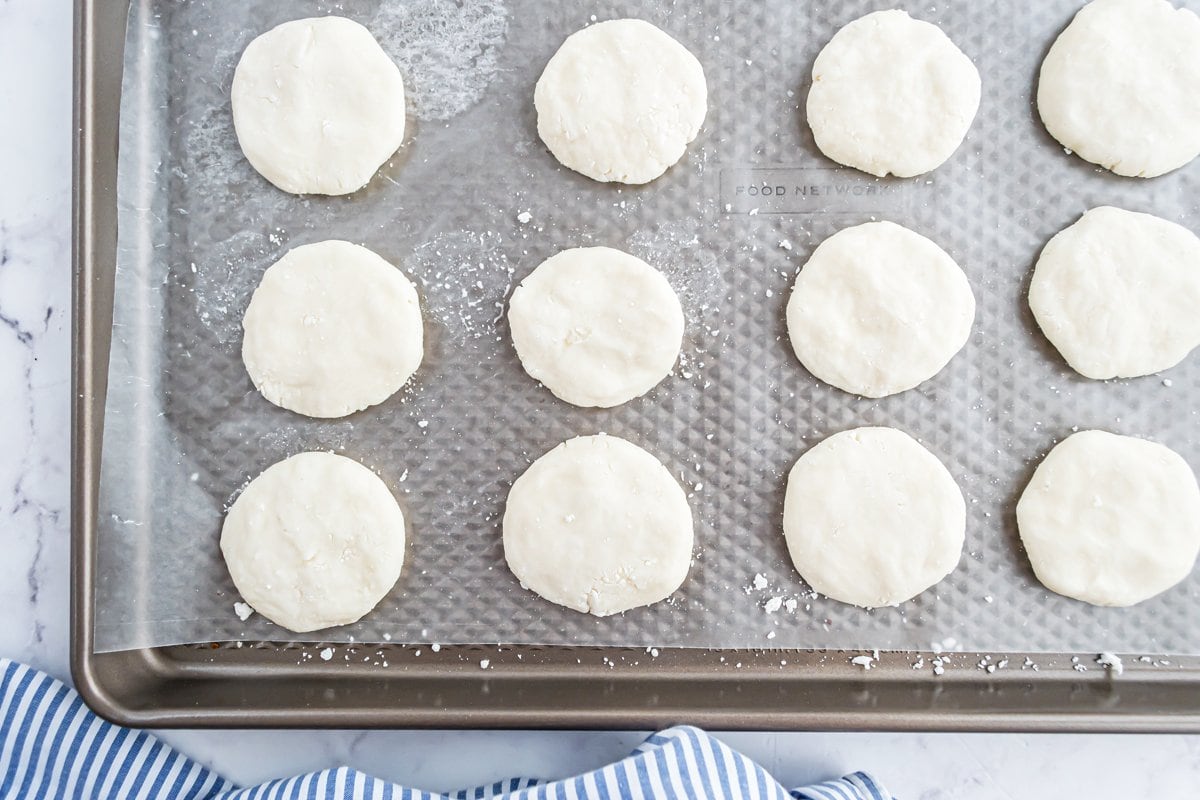
- Form the patties. Next, roll the dough into about 28 1-inch balls. Flatten each ball with the palm of your hand to make the filling for the patties. Allow them to dry at room temperature for at least 2 hours before dipping in the chocolate. Flip the patties over about 1 hour into the drying time.
- Freeze patties. When you are ready to melt the chocolate, place the patties in the freezer for 15-20 minutes first. This allows them to become nice and firm, making them easier to dip.
Melting the Chocolate and Dipping the Cookies
This is the most challenging part, but on the other hand they don’t need to look perfectly pretty and it’s chocolate, so you can always melt and start over.
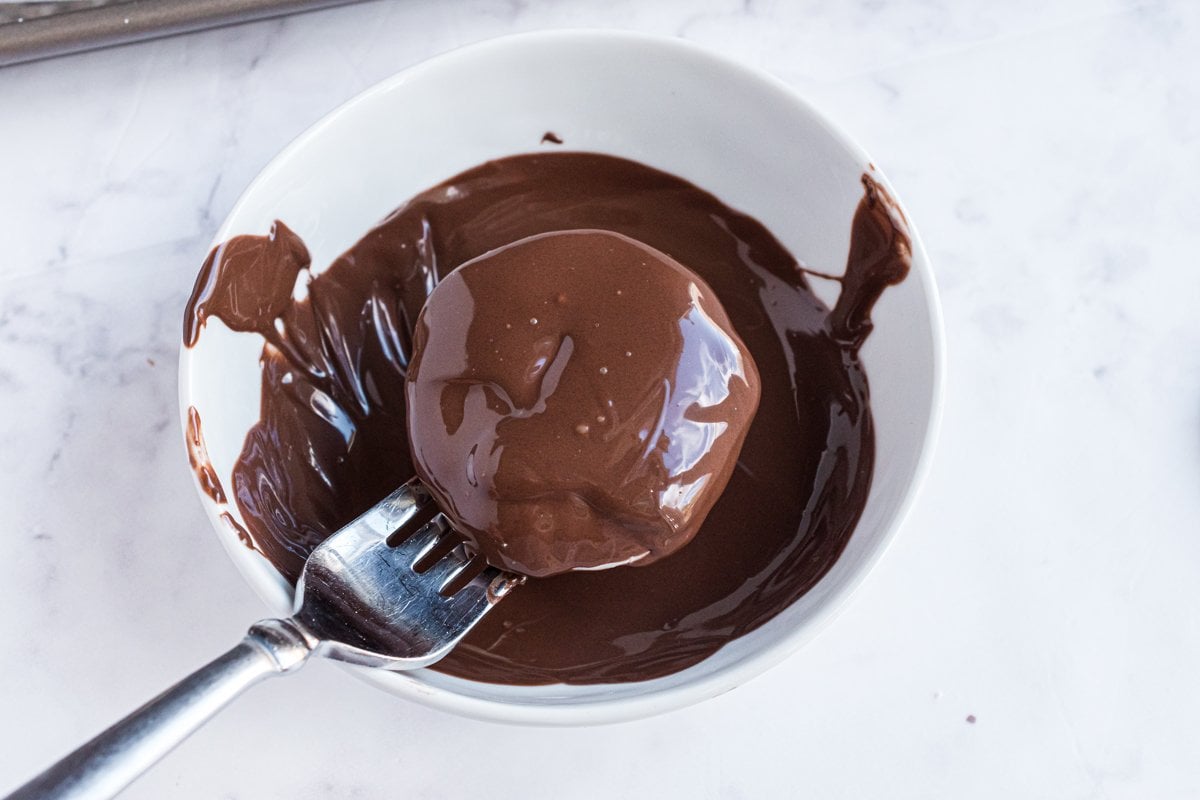
- Melt the chocolate. Use a double boiler to melt the chocolate. Or, melt it in intervals in the microwave — be sure to stir after each interval to keep the chocolate smooth.
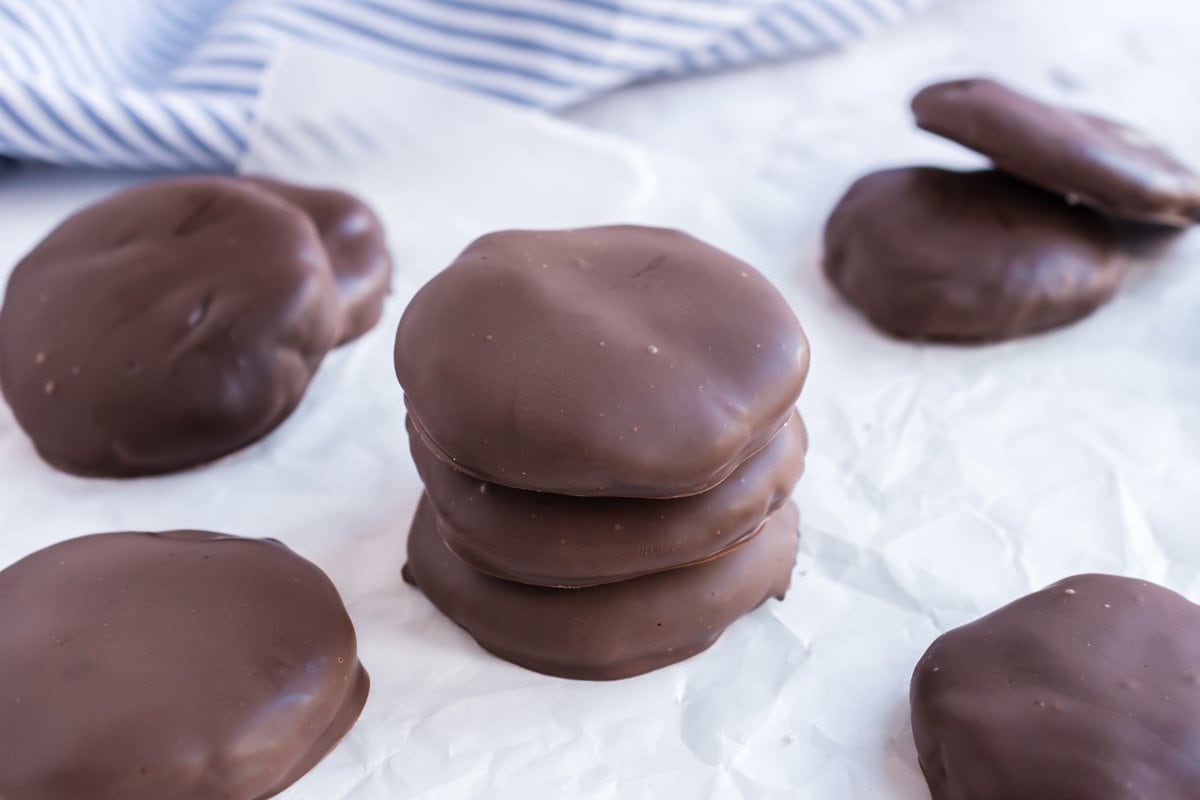
- Dip the patties. Once the chocolate is melted, dip the patties into the chocolate, tapping on the side to get the excess chocolate off. I like using the fork dip method — place the patty on a fork and this prevents your fingers from getting covered in chocolate.
- Let the chocolate harden. Next place the patties onto a parchment paper (or wax paper) lined baking sheet to cool. If you want to add sprinkles, add those on now while the chocolate is tacky. Place them in the refrigerator for an additional 30 minutes to set.
- Serve or store. I store any extras in the refrigerator not only because I prefer mine to be chilled, but because the chocolate has the tendency to sweat a little depending on weather conditions.
Pro Tip
Make sure you allow enough drying time for the creamy filling. Any excess moisture can impact the ability of the chocolate to stick and set to the outside.
Common Questions About Homemade Peppermint Patties
The creamy filling of a peppermint patty is a combination of sweeteners, egg whites, cocoa butter, and flavorings like peppermint. This egg-free version varies slightly but still produces a similar delicious result.
Store-bought peppermint patties typically use dark chocolate but you can also make them with milk chocolate or semi-sweet chocolate.
The candies were named by their original maker, Henry Kessler, for the town in Pennsylvania where they were developed.
Storage
Store these peppermint patties at room temperature in a cool, dry place in an airtight container. Place sheets of parchment paper or wax paper in between layers.
Make Ahead
You can make the minty patties ahead of time and store them in the fridge until you’re ready to dip them.
Refrigerator
We recommend keeping these at room temperature but if you want to keep them in the refrigerator store them in an airtight container for 1-2 weeks. Just be mindful that the chocolate will sweat a little when it comes to temperature.
Freezer
Store the patties in the freezer for up to 3 months in a freezer-safe container.
More Delicious Treats
If you’re on the search for more ways to satisfy your sweet tooth, we have you covered!
Homemade Peppermint Patties
Ingredients
- 3/4 cup sweetened condensed milk
- 1 1/2 teaspoon peppermint extract
- 4 cups powdered sugar
- 1 cup dark chocolate Candy Melts
- Sprinkles if desired
Instructions
- In a medium mixing bowl or the bowl of a stand mixer fitted with a paddle attachment, blend together the sweetened condensed milk, peppermint extract and powdered sugar. Add the food coloring at this step if you desire a color. Mix at a medium speed for 2-3 minutes or until mixture is smooth with no lumps. Dough will be stiff and form patties, but not dry and crumbly.
- Line a large rimmed baking sheet with parchment paper. Roll the dough into approximately 28 1-inch balls. Flatten each with the palm of your hand to make the filling for patties. Allow them to dry at room temperature for at least 2 hours, flipping once.

- Right before melting the chocolate place the peppermint pattie in the refrigerator or freezer for 15-20 minutes. Them being cold will help the chocolate grab and set.
- Melt the chocolate in double boiler. Dip the patties into the chocolate, tapping on the side to get excess off. Place them onto a parchment paper lined baking sheet to cool. If you desire sprinkles, add them now. Place in the refrigerator for an additional 30 minutes to set.
- If you tried this recipe, come back and let us know how it was in the comments or ratings.
Nutrition


👍👍
Easy to assemble and delicious! Next time I will freeze the patties before dipping in chocolate to make it easier to handle and keep its shape. A winner!
I made according to directions and it was simple and straightforward. Definitely something to do again.
However, I found upon tasting the filling that the 1 1/2 tsp of peppermint extract was bland, so Iadded another 1/2 tsp (good quality extract: peppermint and alcohol, Watkins)
and a tad more sugar to take up that moisture.
It was still underwhelming in peppermint flavor. Was it actually supposed to be Tablespoons?
Hi! Maybe it was the extract brand? I tested it with more and it was overwhelming. Extracts can also start to lose flavor about 6 months after opening- was yours by chance older? I had a bakers version from the craft store.
Great recipe, tastes just like peppermint Pattie’s but better. Thank you
Glad you loved it!!!!
I am going to try & make the peppermint Pattie’s. I will let you know how it goes!
Please do!
I measured loosely, and my peppermint mixture was a little stiff and dryish- so I didn’t need to chill it before dipping. Also, I used Ghirardelli candy melts and they set quickly and very smoothly at room temperature. This recipe is so easy, fun, and tasty!
Glad you enjoyed it!
Nowhere does it mention adding the peppermint extract
Hi Samantha, Step #1 states to add “sweetened condensed milk THROUGH powdered sugar, which would include the peppermint extract in the ingredient list. I hope you enjoy them- we sure do!
I made these and they have not set up. What can i add to help it set.
Hi Linda- the peppermint mixture or the chocolate? And they didn’t set in the freezer? The peppermint mix needs to be frozen before covering with chocolate and the chocolate needs to chill to set.
I would like to know if ou added some paraffin wax to the chocolate , if it would help firm and keep the finale pappy from sweating. and keep it in a firmer shape. I find that works with my ‘stuff’,
I did not add any wax to the chocolate, but you certianly can! Maybe I’ll give that a try next time!